DESCRIBE PROCESSES and DAEMONS and PORT:
Describes all the processes and daemons AND PORT that you can find on your system.
sk97638: Check Point Processes and Daemons
sk52421: Ports used by Check Point software
DESCRIBE FEATURES and EXTEND COMMAND:
This article provides a list of the Role-Based Access (RBA) features, feature names in Clish and Gaia Portal, and feature descriptions.
sk98252: List of Role-Based Access features in Gaia OS
COMMAND CONVERTED:
SecurePlatform sysconfig to Gaia CLI
Guide:
SecureXL - Multi - Queue and CoreXLS
R76 Performance Tuning Administration Guide
SNORT Signature Support
R76 IPS Administration Guide
--------------------------------------------------------------------------------------------------------------------------
For test
#snmpwalk -v2c -c name_community localhost
#rpm -qa | grep snmp
#./wget https://mail.google.com
Refer to this SK25977


#include "tcpip.def"
#define src ip_src
#define dst ip_dst
#define sport th_sport
#define dport th_dport
#define port(portnum) ((ip_p=PROTO_tcp and (sport=portnum or dport=portnum)) or \
(ip_p=PROTO_udp and (uh_sport=portnum or uh_dport=portnum)))
#define srcport(portnum) ((ip_p=PROTO_tcp and sport=portnum) or \
(ip_p=PROTO_udp and uh_sport=portnum))
#define dstport(portnum) ((ip_p=PROTO_tcp and dport=portnum) or \
(ip_p=PROTO_udp and uh_dport=portnum))
#define host(hostip) ((src=hostip) or (dst=hostip))
------------------------------------------
- Thread: SNMP activation-
----------------------------------------------------------------------------------------------------
- forum -
----------------------------------------------------------------------------------------------------
- Information about Check Point VPN-1/FireWall-1 port .... -
----------------------------------------------------------------------------------------------------
- seminar it security -
----------------------------------------------------------------------------------------------------
- self study cp r70 -
----------------------------------------------------------------------------------------------------
----------------------------------------------------------------------------------------------------
-------------------------------------------------------------------------------------------------
- Fw Monitor A troubleshooting tool (checkpoint) -
-------------------------------------------------------------------------------------------------
- Import of SNMP-MIB files into Paessler Monitoring Applications -
-------------------------------------------------------------------------------------------------
- troubleshooting mtu checkpoint -
-------------------------------------------------------------------------------------------------
- UTM-1 Edges - FAQ -
-------------------------------------------------------------------------------------------------
- How do change an ip address on a ipso firewall via clish -
-------------------------------------------------------------------------------------------------
- Password recovery nokia ipso -
-------------------------------------------------------------------------------------------------
-------------------------------------------------------------------------------------------------
Describes all the processes and daemons AND PORT that you can find on your system.
sk97638: Check Point Processes and Daemons
sk52421: Ports used by Check Point software
DESCRIBE FEATURES and EXTEND COMMAND:
This article provides a list of the Role-Based Access (RBA) features, feature names in Clish and Gaia Portal, and feature descriptions.
sk98252: List of Role-Based Access features in Gaia OS
COMMAND CONVERTED:
SecurePlatform sysconfig to Gaia CLI
Guide:
SecureXL - Multi - Queue and CoreXLS
R76 Performance Tuning Administration Guide
SNORT Signature Support
R76 IPS Administration Guide
--------------------------------------------------------------------------------------------------------------------------
Install Gaia OS using USB storage device ( required ssh access)
- Update bios Nokia to the last version (enable USB support) (0ABHE005_8030_IP29X.fd)
- Update bootmgr Nokia to the last version (enable USB support) (nkipflash-6.2.bin)
- Update ipso Nokia to the last version (enable USB support) (Check_Point_IPSO6.2_MR5_GA100)(77.30)
- Insert the USB storage device into IP Series appliance.
- From IPSO CLI, mount the USB storage device by running:[HostName]# mount -t msdosfs -o rw DEVICE /cdrom
Use the following table to determine the exact 'DEVICE':
Model
|
device
|
IP150
|
/dev/da0s1
|
IP280
|
/dev/da0s1
|
IP290
|
/dev/da0s1
|
IP690
|
/dev/da0s1
|
IP1280
|
/dev/da1s1
|
IP2450
|
/dev/da1s1
|
- Run the installation script:[HostName]# cd /cdrom/
[HostName]# ./Check_Point_USB_Install_IPSO6.2_to_Gaia
Important note: Do NOT unplug the USB storage device until the Gaia installation is complete.
--------------------------------------------------------------------------------------------------------------------------
ADD User
> add user ifinet_lrossi uid 0 homedir /home/ifinet_lrossi
> set user ifinet_lrossi newpass 1234
> add rba user ifinet_lrossi roles adminRole
> set user ifinet_lrossi shell /etc/cli.sh or > set user admin shell /bin/bash
> save config
> set user ifinet_lrossi newpass 1234
> add rba user ifinet_lrossi roles adminRole
> set user ifinet_lrossi shell /etc/cli.sh or > set user admin shell /bin/bash
> save config
> set expert-password plain
Enter current expert password :
Enter new expert password:
Enter new expert password (again):
Enter new expert password:
Enter new expert password (again):
ADD Defaut Gateway
> set static-route default nexthop gateway address 192.168.1.254 priority 1 on
ADD Snmp Community
> set snmp agent on
> set snmp agent-version any
> set snmp community name_community read-only
> save conf
> set snmp agent-version any
> set snmp community name_community read-only
> save conf
For test
#snmpwalk -v2c -c name_community localhost
#rpm -qa | grep snmp
Wget command
#find / -name wget
# /sysimg/CPwrapper/linux/MiniWrapperForMajor/linux/Actions/wget
#./wget https://mail.google.com
CHECK State cache Url Filtering on GW
#fw tab -t urlf_cache_tbl -s
--------------------------------------------------------------------------------------------------------------------------------
IPS
Command Description
#ips on|off
Enable or disable IPS on the gateway.
#ips stat
Show the IPS status of the gateway.
#ips bypass stat
Show the Bypass Under Load status.
#ips bypass on|off
Enable or disable Bypass Under Load.
#ips bypass set cpu|mem low|high <threshold>
Set the Bypass Under Load threshold.
................
--------------------------------------------------------------------------------------------------------------------------------
CHANGE MAGIC MAC NUMBER
GAiA is Linux RH based, and it has system 2.6.18 kernel. And Check Point ClusterXL is still the same as before.
Some details about the change is mentioned in sk66527: Recommended configuration of new ClusterXL
Refer to this SK25977
This will allow more then one checkpoint cluster to operate on the same VLAN
On each of the Cluster Member
- Run cd $FWDIR/boot/modules
- Create the fwkern.conf file by running vi fwkern.conf
- Add the required parameters and values as given below:
fwha_mac_forward_magic=0xfb
- Save the fwkern.conf
- Verify the fwkern.conf file is correctly configured by running more fwkern.conf
- Reboot the Cluster Member
- Verify the new mac magic setups correctly configured by:
# fw ctl get int fwha_mac_magic
# fw ctl get int fwha_mac_forward_magic - Verify the Cluster Member status by running cphaprob stat
Note: the 250/251 should be the SAME on both cluster members, but should be DIFFERENT for each different clusters
--------------------------------------------------------------------------------------------------------------------------------
DHCP RELAY
Example
dhcp server 192.168.0.1
lan client 172.30.162.0/24
lan client fw1 172.30.162.251
lan client fw2 172.30.162.252
lan client cluster 172.30.162.253
1. To configure the BootP/DHCP Relay Agent, select 'Advanced Routing > DHCP Relay' on the main Configuration menu.
2. Add interfaces that will need to be listening for the BootP or DHCP packets and click "Apply".
Module 1
Module 2
1. Enter the address of the BootP or DHCP server into the New Server field and click "Apply".
2. Be sure to set the Wait Time to "0", as similiar as described above in the "Configuring IPSO" section. Wait Time to "5" for second module
3. If multiple IP addresses have been defined for a particular interface, Gaia will use the numerically lowest IP address bound to that interface as the Source IP address of any BootP/DHCP Packets sent from that interface.
4. Similar to IPSO, the administrator can define the use of some other address that is bound to that interface. For example in Fig.1, if multiple addresses have been defined for the internal interface int.if, then the administrator can define the address to be used as the source for BootP/DHCP transmission to "Client". Traffic between the external interface ext.if and the server will use an address bound to ext.if
In SmartDashboard:
Firewall Rule
Log:
Nat Rule:
--------------------------------------------------------------------------------------------------------------------------------
SNMP Custom
HowTo - cfr sk79280
- Some SNMP functionality cannot be configured via Gaia's CLI or WebUI.
- In order to extend the SNMP configuration manually on a Gaia machine, add a new snmpd configuration file:
/etc/snmp/userDefinedSettings.conf
- The file should contain legal snmpd settings.
- Every net-snmp configuration token is valid.
Step by step procedure
- Shut down snmpd from WebUI or from clish using:
set snmp agent off
- Go to expert mode:
expert
- Check that snmpd process is down:
ps -ef | grep snmpd
- Execute the following commands:
dbset process:snmpd:arg:2 -c
dbset process:snmpd:arg:3 /etc/snmp/userDefinedSettings.conf
- Add the new configuration file:
vi /etc/snmp/userDefinedSettings.conf
- Add snmpd settings (warning: path of fw.log depends on software version):
disk / 10%
disk /boot 10%
disk /var/log 10%
file /opt/CPsuite-R75.40/fw1/log/fw.log
- Start snmpd from WebUI or from clish using:
set snmp agent on
- Save the configuration from clish:
save config
Notes
- snmpd restart is required upon "/etc/snmp/userDefinedSettings.conf" modification
- The file might not be backed-up by Gaia's backup functionality
- The file might not survive an upgrade
- This capability is planned to be part of a future Gaia release
Example Custom Control
Concurrent remote access users
Create /usr/bin/rausers
#!/bin/sh
fw tab -t userc_users -s 2> /dev/null | grep localhost | awk '{printf $4"\n"}'
Add the following line to /etc/snmp/snmpd.users.conf
exec .1.3.6.1.4.1.2021.74 numRAusers /usr/bin/rausers
Restart the snmp demon
service snmpd restart
Check it's working with
snmpwalk -c ComunityName -v 2c localhost .1.3.6.1.4.1.2021.74
------------------------------------------------------------------------------------------------------------
DLP
To enable Mirror Port Mode:
Use the dlp_smtp_mirror_port command:
#dlp_smtp_mirror_port
Description
Enables SMTP Mirror Port Mode
Syntax
#dlp_smtp_mirror_port |status | enable |disable
------------------------------------------------------------------------------------------------------------
SNMP
Activating the SNMP service on the Gaia OS
https://supportcenter.checkpoint.com/supportcenter/portal?eventSubmit_doGoviewsolutiondetails=&solutionid=sk90860
- Login to Gaia Portal.
- Go to '
System Management' → click on 'SNMP':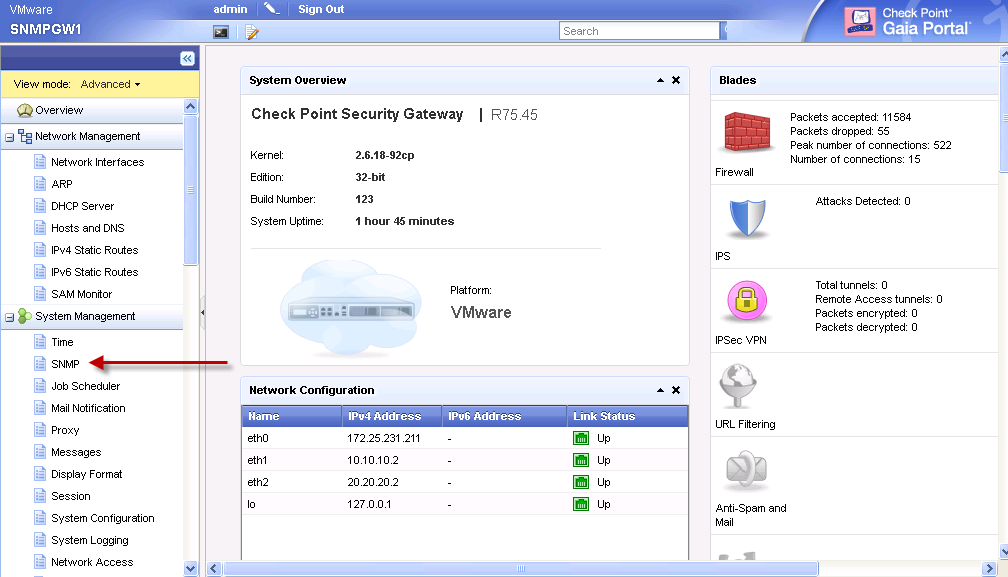
- Enable the SNMP service by checking the box '
Enable SNMP Agent' and apply the changes. - "
SNMP location string" allows to input the location details of the system. - "
SNMP Contact String" allows to input the contact information for the system. - Configure "
Agent Addresses" to limit the interfaces where the SNMP agent will be "listening to". Uncheck all the interfaces that are not facing your SNMP device:
- "
V1 / V2 Settings" allow to change the community string for RO (Read Only) or RW (Read Write):
- "
V3 - User-Based Security Model (USM)" allows creating accounts, which permit specific SNMP access:
- "
Enabled Traps" enable the Gaia OS built-in SNMP Traps. The following traps can be enabled:AuthorizationError= Notifies when an SNMP operation is not properly authenticated.Coldstart= Notifies when the SNMPv2 agent is re-initialized.ConfigurationChange= Notifies when a change to the system configuration is applied.ConfigurationSave= Notifies when a permanent change to the system configuration occurs.fanFailure= Notifies when a CPU or chassis fan fails.highVoltage= Notify if one of the voltage sensors exceeds its maximum value.linkUpLinkDown= Notifies when one of the links changes state to up or down.lowDiskSpace= Notifies when space on the system disk is low. This trap is sent if the disk space utilization in the / partition has reached 80 percent or more of its capacity.lowVoltage= Notify if one of the voltage sensors falls below its minimum value.overTemperture= Notifies when the temperature rises above the threshold.PowerSupplyFailure= Notifies when a power supply for the system fails.This trap is supported only on platforms with two power supplies installed and running.raidVolumeState= Notify if the raid volume state is not optimal. This trap works only if RAID is supported on the Gaia appliance or computer. To make sure that RAID monitoring is supported, run the command raid_diagnostic and confirm that it shows the RAID status.
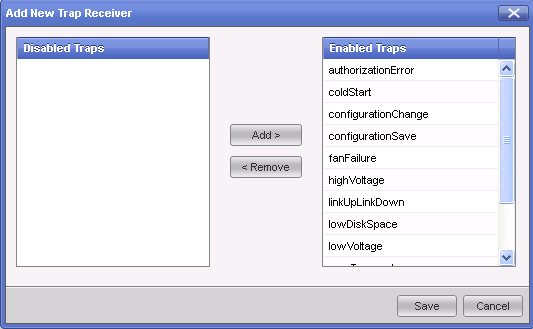
- "
Trap Receivers Settings" allow configuring the IP address of remote trap receiver. You can add more than one trap receiver, so multiple systems will receive the SNMP traps:
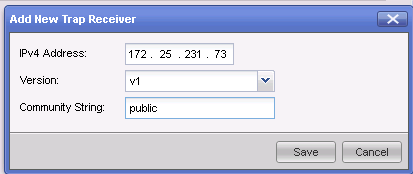
Verifying the SNMP is running properly
Run the following commands in Expert Mode:
- Check that snmpd daemon is running:
[Expert@HostName]# ps aux | grep -v grep | grep snmpd
Example:
- Check that Gaia OS listens on port 161:
[Expert@HostName]# netstat -an | grep -v grep | grep 161
Example:
- Check that Gaia OS answers to SNMP Requests:
[Expert@HostName]# snmpwalk -c <community_name> -v 2c localhost 1.3.6.1.2.1
Example: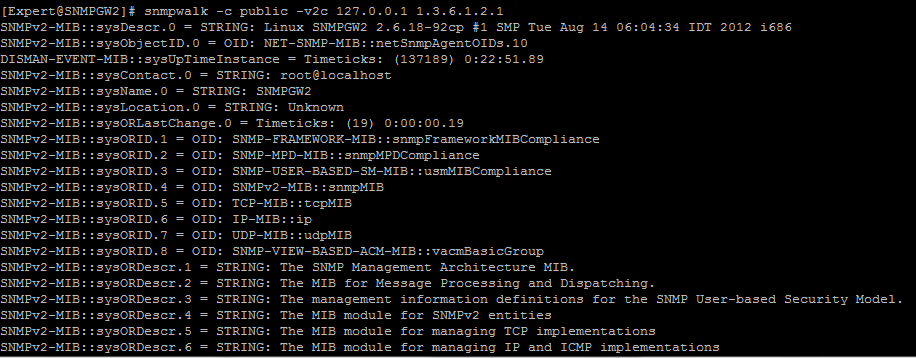
- Check that Check Point software answers to SNMP Requests:
[Expert@HostName]# snmpwalk -c <community_name> -v 2c localhost 1.3.6.1.4.1.2620
Example: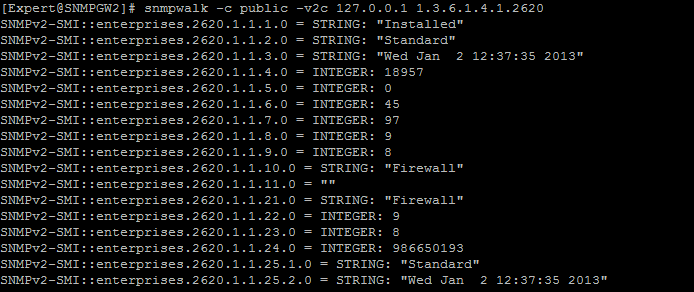
Modifying the SNMPD configuration files
- Check if snmpd daemon is running:
[Expert@HostName]# ps aux | grep -v grep | grep snmpd - Shut down the SNMP service:
- Either in Gaia Portal:
Go to 'System Management' → click on 'SNMP' → uncheck the box 'Enable SNMP Agent' → apply the changes. - Or with CLI command in Clish:
HostName> set snmp agent off - Or with CLI command in Expert mode:
[Expert@HostName]# service snmpd stop
- Either in Gaia Portal:
- Check if snmpd daemon stopped running:
[Expert@HostName]# ps aux | grep -v grep | grep snmpd - Register a new SNMPD configuration file:
[Expert@HostName]# dbset process:snmpd:arg:2 -c[Expert@HostName]# dbset process:snmpd:arg:3 /etc/snmp/userDefinedSettings.conf - Create the new SNMPD configuration file:
[Expert@HostName]# touch /etc/snmp/userDefinedSettings.conf - Add the user defined SNMPD settings (for example:
sysName <New_sysName>).
Note: use Vi editor to modify the/etc/snmp/userDefinedSettings.conffile.
Important Note:
Monitoring of specific OIDs can be added to the file using the following syntax in the/etc/snmp/userDefinedSettings.conffile:monitor -I -r <number_of_seconds> "Text" <OID> Operator <Value>
where:-I- Indicates that the monitored expression should be applied to the specified OID as a single instance. By default, the OID will be treated as a wildcarded object, and the monitor expanded to cover all matching instances.-r <number_of_seconds>- Frequency of evaluation in seconds. By default, the expression will be evaluated every 600s (10 minutes).Text- The text string to be sent with the SNMP TrapOID- OID to be monitored for the SNMP TrapOperator- One of these comparison operators: "==" Equal to ; "!=" Not equal to ; ">" Greater than ; "<" Less thanValue- Integer value, or string (must be inside double quotes)
For complete description of the 'monitor' operator, refer to the http://linux.die.net/man/5/snmpd.confmanual page - refer to this section:
Example:
monitor [OPTIONS] NAME EXPRESSION
- Let us monitor the '
ifOperStatus' (operational state) of the Loopback interface.
This 'ifOperStatus' OID 1.3.6.1.2.1.2.2.1.8 responds with one of these values:- 1 = up
- 2 = down
- 3 = testing
- Let us configure the machine to send an SNMP Trap every 2 seconds if operational state of the Loopback interface is not 'Up'.
- In order to query the specific interface, first we need to get the interface's index:
[Expert@HostName]# snmpwalk -c <community_name> -v 2c localhost IF-MIB::ifDescr
Note:
The line for Loopback interface should look similar to this:IF-MIB::ifDescr.1 = STRING: lo - Hence, the syntax would be:
monitor -I -r 2 "Test Loopback Trap" .1.3.6.1.2.1.2.2.1.8.1 != 1
- Let us monitor the '
Some Recommended Traps:
Management Server Health:
monitor -I -r <number_of_seconds> "FWM daemon is up" .1.3.6.1.4.1.2620.1.7.6.0 = 1
monitor -I -r <number_of_seconds> "Problem With Management Server (Short Description)" .1.3.6.1.4.1.2620.1.7.102.0 != "OK"
monitor -I -r <number_of_seconds> "Problem With Management Server (Long Description)" .1.3.6.1.4.1.2620.1.7.103.0 != "OK"

System Health (FW):
monitor -I -r <number_of_seconds> "Connections are higher than XXXX" .1.3.6.1.4.1.2620.1.1.25.3.0 > XXXX
monitor -I -r <number_of_seconds> "Policy is not installed on Security Gateway" .1.3.6.1.4.1.2620.1.1.1.0 != "Installed"
monitor -I -r <number_of_seconds> "Wrong Policy has been applied to Security Gateway" .1.3.6.1.4.1.2620.1.1.25.1.0 != "Desired_Policy_Name>"

Cluster Status Monitoring:
monitor -I -r <number_of_seconds> "Cluster Member is no longer active" .1.3.6.1.4.1.2620.1.5.6.0 != "active"
monitor -I -r <number_of_seconds> "Cluster Problem with Full Synchronization" .1.3.6.1.4.1.2620.1.5.13.1.3.1.0 != "OK"
monitor -I -r <number_of_seconds> "Cluster Problem with Policy (Filter)" .1.3.6.1.4.1.2620.1.5.13.1.3.2.0 != "OK"
monitor -I -r <number_of_seconds> "Cluster Problem with CPHAMCSET (CPHAD)" .1.3.6.1.4.1.2620.1.5.13.1.3.3.0 != "OK"
monitor -I -r <number_of_seconds> "Cluster Problem with FWD" .1.3.6.1.4.1.2620.1.5.13.1.3.4.0 != "OK"

Disk Space Monitoring:
monitor -S -r <number_of_seconds> -o "Free disk space under '/' lower than XX percentage" .1.3.6.1.4.1.2620.1.6.7.6.1.6.1.0 < XX
monitor -S -r <number_of_seconds> -o "Free disk space under '/var/log' lower than XX percentage" .1.3.6.1.4.1.2620.1.6.7.6.1.6.3.0 < XX

System Health (OS):
monitor -I -r <number_of_seconds> "System have been rebooted in the last 10 minutes" .1.3.6.1.2.1.1.3.0 < 600

System Health (Hardware):
monitor -I -r <number_of_seconds> "CPU utilization is higher than 60%" .1.3.6.1.4.1.2021.11.11.0 < 40
monitor -I -r <number_of_seconds> "Current CPU utilization is High" .1.3.6.1.4.1.2021.10.1.3.1 > 5
monitor -I -r <number_of_seconds> "Current CPU utilization is Extremely High" .1.3.6.1.4.1.2021.10.1.3.1 > 5
monitor -I -r <number_of_seconds> "Average CPU utilization during last 15 Min is High" .1.3.6.1.4.1.2021.10.1.3.3 > 5
monitor -I -r <number_of_seconds> "System is low on RAM" .1.3.6.1.4.1.2021.4.5 < "1000000"
monitor -I -r <number_of_seconds> "RAM Swap Error" .1.3.6.1.4.1.2021.4.100.0 != 0

Sensors Monitoring (for Check Point Appliances only):
monitor -I -r <number_of_seconds> "CPU 1 Over Heating" .1.3.6.1.4.1.2620.1.6.7.8.1.1.3.1.0 > 50
monitor -I -r <number_of_seconds> "CPU 2 Over Heating" .1.3.6.1.4.1.2620.1.6.7.8.1.1.3.2.0 > 50
monitor -I -r <number_of_seconds> "Power Supply 1 is down" .1.3.6.1.4.1.2620.1.6.7.9.1.1.2.1 != "UP"
monitor -I -r <number_of_seconds> "Power Supply 2 is down" .1.3.6.1.4.1.2620.1.6.7.9.1.1.2.2 != "UP"
monitor -S -r <number_of_seconds> -o .1.3.6.1.4.1.2620.1.6.50.1.1.3 "Link Up" .1.3.6.1.4.1.2620.1.6.50.1.1.7 == 1
monitor -S -r <number_of_seconds> -o .1.3.6.1.4.1.2620.1.6.50.1.1.3 "Link Down" .1.3.6.1.4.1.2620.1.6.50.1.1.7 == 0
- Enable the SNMP service:
- Either in Gaia Portal:
Go to 'System Management' → click on 'SNMP' → check the box 'Enable SNMP Agent' → apply the changes. - Or with CLI command in Clish:
HostName> set snmp agent on - Or with CLI command in Expert mode:
[Expert@HostName]# service snmpd start
- Either in Gaia Portal:
- Check that SNMPD daemon is running:
[Expert@HostName]# ps aux | grep -v grep | grep snmpd
Example:
- Save the Gaia configuration in Clish:
HostName> save config
Testing the SNMP Traps
- Connect to Gaia machine (over SSH or over console).
- Determine through which interface the SNMP Traps should be sent to Trap Sink:
[Expert@HostName]# ip route get <IP_Address_of_Trap_Sink_server>
Example:[Expert@Gaia]# ip route get 192.168.204.17 192.168.204.17 dev eth0 src 192.168.204.10 cache mtu 1500 advmss 1460 hoplimit 64 [Expert@Gaia]# - Capture the SNMP Trap traffic (UDP port 162) on the relevant interface (through which the SNMP Traps will be sent to Trap Sink):
[Expert@HostName]# tcpdump -s 1500 -vvp -nn -i interface_name udp port 162 - Look for SNMP Traps being sent to Trap Sink:
Note: If you have configured SNMP Traps for network cards, you can disable one of the network interfaces in Gaia Portal, or on CLI in order to generate a trap.
Warning: Make sure not to disable the interface, through which you are connected to this machine.
Related solutions:
- sk91081 (Excessive memory utilization by /bin/confd daemon on Gaia)
- sk89300 (SNMPD daemon crashes after interface IP address change on Gaia OS)
- sk90362 (SNMPD daemon fails to start on Gaia)
- sk73440 (Check Point MIB file has multiple compliance errors in SMI syntax)
- sk56783 (How to debug SNMPD daemon on SecurePlatform and Gaia)
- sk65923 (How to configure the cluster to send SNMP Trap upon fail-over)
- sk77260 ('snmpwalk' always reports speed of 10 Gb interfaces as 10 Mbps)
- sk72760 ('snmpwalk' always reports speed of Bond and Bridge interfaces as 10 Mbps)
- sk78360 (How to Extend SNMP)
- sk71980 (Output of a 'snmpwalk' command with 'exec' extension or 'extend' extension is limited)
----------------------------------------------------------------------------------------------------
Checkpoints fw monitor utility performs packet captures similar to tcpdump and wireshark. Unlike these utilities it operates above layer 2 and contains no mac address information. It does contain additional information from the firewall on interface and direction.
To view this additional information in wireshark some extra configuration is required.
Select edit/preferences/protocols/ethernet
Check the box labelled “Attempt to interpret as Firewall-1 monitor file” and press ok
Select edit/preferences/User Interface/columns
Click add to add a new column and name it interface.
From the format dropdown listbox select FW-1 monitor if/direction and press ok
Save the text below to a file colorise.txt
# DO NOT EDIT THIS FILE! It was created by Wireshark
@FW-Mon-i @ fw1.direction contains "i"@[65535,65535,0][0,0,0]
@FW-Mon-I @fw1.direction contains "I"@[37008,61166,37008][0,0,0]
@FW-Mon-o@fw1.direction contains "o"@[44461,55512,59110][0,0,0]
@FW-Mon-O@ fw1.direction contains "O"@[31161,49051,54875][0,0,0]
@FW-Mon-i @ fw1.direction contains "i"@[65535,65535,0][0,0,0]
@FW-Mon-I @fw1.direction contains "I"@[37008,61166,37008][0,0,0]
@FW-Mon-o@fw1.direction contains "o"@[44461,55512,59110][0,0,0]
@FW-Mon-O@ fw1.direction contains "O"@[31161,49051,54875][0,0,0]
Select View/coloring rules
Click import and open the saved file from above
Select the last 4 rules and move them to the top of the list by clicking the up button
Press ok
Your now ready to view the fw monitor files in wireshark.
References
Every checkpoint firewall, regardless of platform, includes the packet capture utility fw monitor. The problem with fw monitor is the cryptic inspect syntax that you need to learn to create a capture filter. Unfortunately, if your looking for support from checkpoint then your stuck with fw monitor. To simplify the process I have created a couple of macros that help bridge the gap between the two syntaxes.
When capturing with tcpdump I generally use the host and port commands to reduce the traffic to a particular set of conversations between hosts. An example expression, in tcp dump syntax, to capture all dns traffic either udp or tcp between 192.168.1.1 and 192.168.1.12 is shown below.
"host 192.168.1.1 and 192.168.1.12 and port 53"
After creating a few simple inspect macros we can do the equivalent using fw monitor with
accept host(192.168.1.1) and host(192.168.1.12) and port(53);
This is not a bad approximation. The only differences are brackets needed to pass the parameters to the macro, and a repeat of the host command.
The savings are obvious compared to the complete inspect script syntax shown below.
accept (
(ip_src=192.168.1.1 or ip_src=192.168.1.12) and \
(ip_dst=192.168.1.1 or ip_dst=192.168.1.12) \
) and \
(
(ip_p=PROTO_tcp and (th_sport=53 or th_dport=53)) or \
(ip_p=PROTO_udp and (uh_sport=53 or uh_dport=53)) \
);
(ip_src=192.168.1.1 or ip_src=192.168.1.12) and \
(ip_dst=192.168.1.1 or ip_dst=192.168.1.12) \
) and \
(
(ip_p=PROTO_tcp and (th_sport=53 or th_dport=53)) or \
(ip_p=PROTO_udp and (uh_sport=53 or uh_dport=53)) \
);
The macros can be saved in a separate library file and included in a filter file or you can just include all the macros in one large command file with the filter expression as shown below.
#include "tcpip.def"
#define src ip_src
#define dst ip_dst
#define sport th_sport
#define dport th_dport
#define port(portnum) ((ip_p=PROTO_tcp and (sport=portnum or dport=portnum)) or \
(ip_p=PROTO_udp and (uh_sport=portnum or uh_dport=portnum)))
#define srcport(portnum) ((ip_p=PROTO_tcp and sport=portnum) or \
(ip_p=PROTO_udp and uh_sport=portnum))
#define dstport(portnum) ((ip_p=PROTO_tcp and dport=portnum) or \
(ip_p=PROTO_udp and uh_dport=portnum))
#define host(hostip) ((src=hostip) or (dst=hostip))
/* dns traffic between hosts */
accept host(192.168.1.1) and host(192.168.1.12) and port(53);
accept host(192.168.1.1) and host(192.168.1.12) and port(53);
Once saved to a file, say myfilter.def, it is a simple matter of running
fw monitor -i -f myfilter.def
and generating, or waiting for the traffic you need to capture.
Enable SCP – sk26258
· Go into expert mode and add users to the /etc/scpusers file. Create the file if necessary.
· Restart sshd using the command service sshd restart
Enable IP Forwarding – sk25818
· Go into expert mode and type the command “echo 1 > /proc/sys/net/ipv4/ip_forward”
Enable SSH Public key Authentication – sk30366
· Go into expert mode
· mkdir $HOME/.ssh
· chmod 0700 $HOME/.ssh
· touch $HOME/.ssh/authorized_keys
· chmod 0600 $HOME/.ssh/authorized_keys
· vi $HOME/.ssh/authorized_keys
· :$ (goes to the last line of the file)
· A (appends to the end of the line)
· paste in the key that you have copied from the client
· esc (get out of insert mode)
· : x (save the file and exit)
To be able to match a login to a users key perform the following steps.
· vi /etc/ssh/sshd_config
· find the Logging section and add en entry LogLevel VERBOSE
· Restart sshd using the command service sshd restart
· The fingerprint of the key used is then recorded in /var/log/secure
· To check the fingerprints you can use the getfingerprints.sh script below
#! /bin/bash
#Generate fingerprints for ssh public keys so we can match logons to users
#Create a temp file and bail out if we can't
TMPFILE=`mktemp /tmp/fingerprint.XXXXXX` || exit 1
FPFILE=/home/admin/fingerprints.txt
#Check to see if a keyfile is specified
if [ -r "$1" ]; then
KEYFILE=$1
else
KEYFILE=/home/admin/.ssh/authorized_keys
fi
#Cleanup temp files on exit
trap "rm -f ${TMPFILE}" 0
#Truncate the output file
cat /dev/null >${FPFILE}
#Hook up the authorized_keys file to File descriptor 3
exec 3< ${KEYFILE}
#loop through each key in the file
while read <&3
do
if (!(echo ${REPLY} | egrep "^\#"i)); then
# If not a comment then save the key and generate a fingerprint
echo "${REPLY}" >${TMPFILE}
/usr/bin/ssh-keygen -l -f ${TMPFILE} >> ${FPFILE}
fi
done
#Close FD 3
exec 3<&-
/bin/echo "The fingerprints for ${KEYFILE} have been saved in ${FPFILE}."
Convert a securecrt ssh public key for use with secureplatform.
This recipe converts IETF multiline key format to the single line format used by openssh on secureplatform.
· Go into expert mode
· create a new file on the firewall with vi. For example vi mypubkey.txt
· Paste in the new key, save the file and exit.
· type “ssh-keygen -i -f mypubkey.txt >>/home/admin/.ssh/authorized_keys
Restrict a public key authentication to a single command
This recipe is useful if you want to restrict users to a particular operation such as shutdown or reboot.
· Go into expert mode
· edit /home/admin/.ssh/authorized_keys
· Paste in the new key or modify the old key
· At the beginning of the line containing the key insert command=”/sbin/shutdown -h now”
· Save and exit
· Change the shell for admin using the command usermod -s /bin/bash -U admin
· If you prefer to go into the cpshell when logging in interactively then execute the command “echo exec /bin/cpshell > /etc/profile.d/zchngshell.sh
Increase OSPF adjacency memberships on SecurePlatform Pro – sk32568
· Go into expert mode
· vi /etc/rc.d/init.d/rc.local
· add the line ” echo 50 > /proc/sys/net/ipv4/igmp_max_memberships"
· save and exit (: x)
Identify network adapters on Secureplatform/Linux
The recipe helps you identify which physical nic is mapped to an alias such as eth1 by flashing them in turn for 15 seconds. Adjust the time to suit yourself
· Go into expert mode
· type the following command all on one line
for i in `egrep "eth[0-9]+" /etc/modules.conf | cut -f2 -d" "`; do echo $i;ethtool -p $i 15; done
- Thread: SNMP activation-
----------------------------------------------------------------------------------------------------
- firewall tips -----------------------------------------------------------------------------------------------------
- forum -
----------------------------------------------------------------------------------------------------
- Information about Check Point VPN-1/FireWall-1 port .... -
----------------------------------------------------------------------------------------------------
- seminar it security -
----------------------------------------------------------------------------------------------------
- self study cp r70 -
----------------------------------------------------------------------------------------------------
- vpn phase 1 phase 2 -
----------------------------------------------------------------------------------------------------
- VPN Trouble shooting -----------------------------------------------------------------------------------------------------
----------------------------------------------------------------------------------------------------
- BinTec IPsec enabled routers shared secret -
----------------------------------------------------------------------------------------------------
- Fw Monitor A troubleshooting tool (nokia) -----------------------------------------------------------------------------------------------------
-------------------------------------------------------------------------------------------------
- Fw Monitor A troubleshooting tool (checkpoint) -
-------------------------------------------------------------------------------------------------
- Import of SNMP-MIB files into Paessler Monitoring Applications -
-------------------------------------------------------------------------------------------------
- troubleshooting mtu checkpoint -
-------------------------------------------------------------------------------------------------
- UTM-1 Edges - FAQ -
-------------------------------------------------------------------------------------------------
- How do change an ip address on a ipso firewall via clish -
-------------------------------------------------------------------------------------------------
- Password recovery nokia ipso -
-------------------------------------------------------------------------------------------------
-------------------------------------------------------------------------------------------------
