________________
____________
1. issue a "cphaconf set_ccp broadcast" on all cluster members
Android Configuration
To configure L2TP on the Android device:
1. Go to device's 'Settings > Wireless & Networks > VPN Settings > Add VPN' and select "Add L2TP/IPSec PSK VPN". The following window will appear:
2. In the opened window:
Connecting to the VPN Security Gateway:
1. Go to device's 'Settings > Wireless & Networks > VPN Settings' and select your VPN connection. The user name and Password screen appears. Enter your credentials for authentication.
Important: We don't recommend using the L2TP option in Android due to security vulnerabilities issues.


00643766 Internal user passwords can be up to 8 ASCII characters.
Native Application
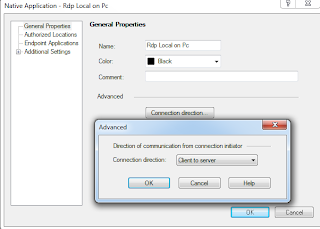


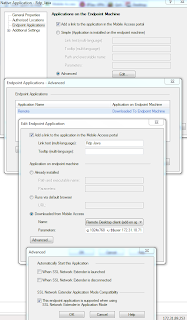
-g 1024x768 -l WARN -d domain.local -u $$user 169.169.169.169
More Info : R75.40 Mobile Access Administration Guide

ASDSAD
- ISP REDUNDACY
- APPLY HFA in FIREWALL CLUSTER
- L2TP
- SSL NETWORK EXTENDER
- MOBILE ACCESS BLADE IPHONE/IPAD SUPPORT
- IDENTITY AWARENESS
- SMART EVENT
- SECURE CLIENT E75.20
- CERTIFICATE 3rd Party
- ENDPOINT SECURITY SERVER (install/upgrade)
How to Configure ISP Redundancy in SecurePlatform
|
____________
- APPLY HFA in FIREWALL CLUSTER
see
Fully Connectivity Upgrade
in
hfa-install-ipso-4-0-vrrp
1.) Installed HFA on the backup system and rebooted the system: State-sync was "ready"
2.) On the backup system i issued a fw fcu <primary IP>
It reported a successful full-sync and the active Clusternode stopped processing traffic (ups!).
3.) I changed the VRRP-priority so that the backup system got the higher priority, still no traffic was processed.
4.) I installed the HFA (which issues a cpstop) on the other node, still no traffic
5.) The cluster started to work again after the reboot of the second cluster node.
1. issue a "cphaconf set_ccp broadcast" on all cluster members
2. upgrade backup node ( i´ve used smartupdate )
3. check ha status : "cphaprob stat" - upgraded node should be down and the active node should be active or active attention
4. issue following command on the upgraded machine "fw fcu <here the ip of the sync interface of the other node>"
5. issue a "cphastop" on the active node -> now ipso will fail over and the upgraded node will become master
6. upgrade the remaining node, after the node is upgraded it will return to master state and process the traffic again
7. issue a cphaconf set_ccp multicast on all members to return to sync via multicast (optional)
----------------------------------------------------------------------------------------------
1. Run cphaconf set_ccp broadcast on all cluster members
2. check licenze
3. upgrade firewall B
4. reboot
5. install policy
6. cphaprob stat command (executed on a cluster member), verify that the status of cluster
7. member A is Active or Active Attention. The remaining cluster members will have a Ready status.
8. Run fw fcu <other member ip on sync network>
9. cphastop firewall A
10. cpstop firewall A
11. upgrade firewall A
12. reboot
13. install policy
14. Run cphaconf set_ccp multicast followed by cphastart on all cluster members
##############################################################################
L2TP
Solution ID: 
sk63324 Version: R71.30 Gateway Configuration
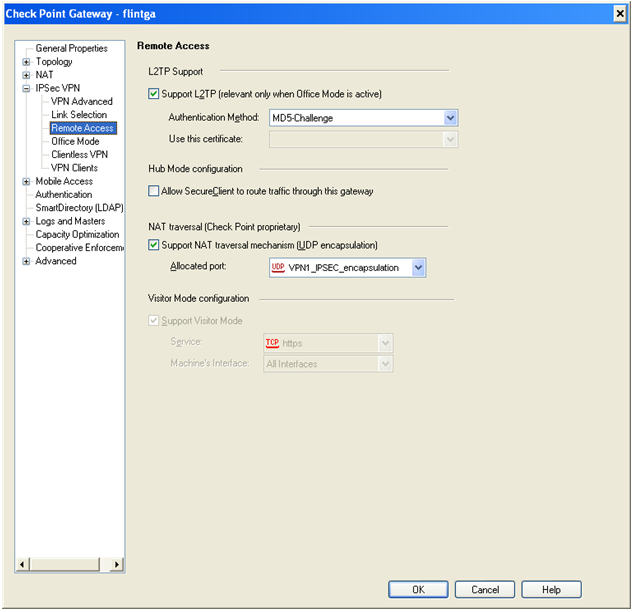
To configure the L2TP Support for the gateways:
1. Enable L2TP on the specific gateway: ('Gateway Properties > IPSEC VPN > Remote Access') Select "Support L2TP" checkbox:
2. L2TP requires Office Mode definition for the Security Gateway: 'Gateway Properties > Remote Access > Office Mode'.
Define:
- Allow Office Mode to all users (or to a specific group).
- Define the Office Mode method. i.e. "Manual (Using IP pool)" and define the Office Mode network pool addresses:

- Configure the DNS server of the organization and its domain suffix in the "IP Pool Optional Parameters" window:
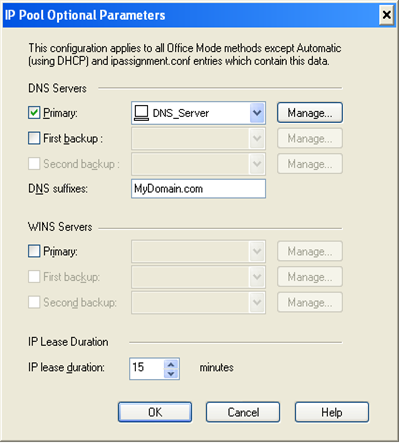
* For more office mode configurations methods and options go to the VPN Gateway Admin guide.
3. Configure a global Pre-Shared key: 'Global Properties > Remote Access > VPN Authentication > Support L2TP with Pre-Shared key':
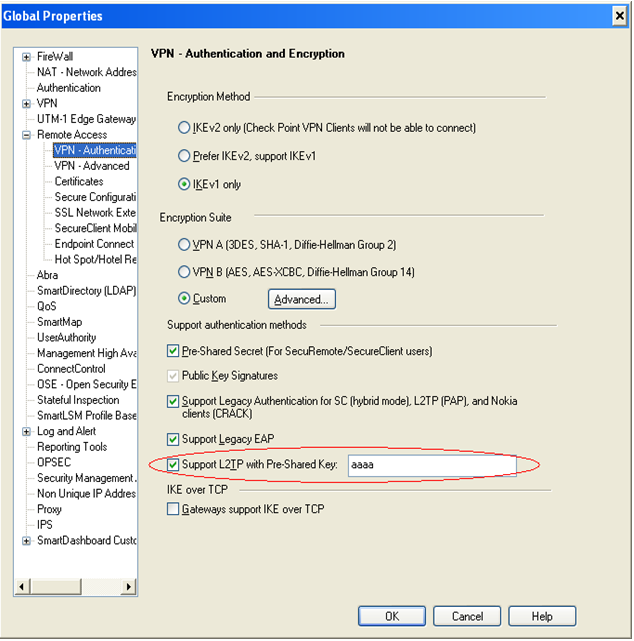
Note: For Security Gateway versions before R71 there was no GUI for configuring the Pre-Shared key.It was configured in a file calls l2tp.conf on the Security Gateway under $FWDIR/conf.
iPhone Configuration
To configure L2TP on the iPhone:
- From your iPhone home screen, go to 'Settings > General > Network > VPN > Add Configuration'.
- In the L2TP page: Provide your VPN-1 server FQDN (DNS name) or IP address, your user name, and the global shared secret:
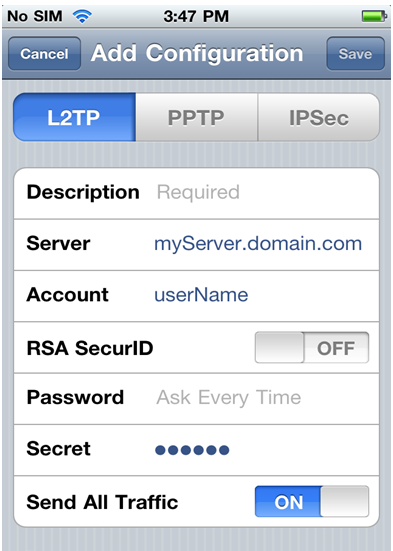
Connecting to the VPN Security Gateway:
- Go to Settings and set the VPN switch to "ON". The Password screen appears. Enter your password.
To configure L2TP on the Android device:
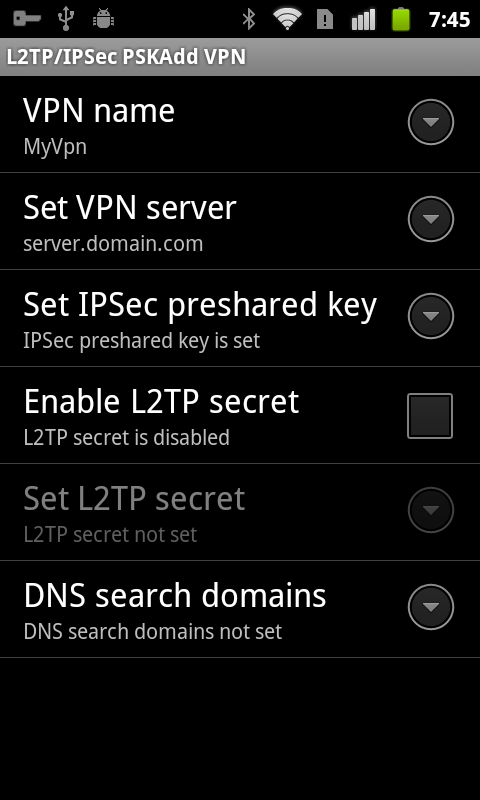
1. Go to device's 'Settings > Wireless & Networks > VPN Settings > Add VPN' and select "Add L2TP/IPSec PSK VPN". The following window will appear:
2. In the opened window:
- Give a VPN Name to your connection (i.e. MyVpn).
- In "Set VPN Server", provide your VPN-1 server FQDN (DNS name) or IP address.
- In "Set IPSec pre shared key", set the global pre shared secret key.
- You might be asked to enter the storage credentials. In case it is the first time that you are using the storage, you will have to define a new password for it.
- Tap on menu to save changes.
Connecting to the VPN Security Gateway:
1. Go to device's 'Settings > Wireless & Networks > VPN Settings' and select your VPN connection. The user name and Password screen appears. Enter your credentials for authentication.
Important: We don't recommend using the L2TP option in Android due to security vulnerabilities issues.
| |||
Configuration on iPhone:
*** IMPORTANT NOTE **** The iPhone L2TP/IPSec VPN client does have some limitations and is not fully featured as the VPN Client on the MacOS; EAP (MD5) is not supported, therefore need to change the 'Authentication Method' from 'MD5-CHALLENGE' to 'Smart Card or other certificate...' In the remote access, under the option of ‘L2TP support’. In order fix this you need to disable the built in SecureID feature on the iPhone / iPad (The feature shold be switched to OFF) and instead put the pin-code prior to the token code when entering in the password field: ie: Pin: 1234 Token Code; 777777 So this would make the password: 1234777777 How to debug the L2TP issues To troubleshot the L2TP problems, debug the VPN process by running the vpn debug on command from the command line.From another shell/window run the kernel debug simultaneously: fw ctl debug 0To turn off the debug, run the following commands: vpn debug off |
##############################################################################
- SSL NETWORK EXTENDER


ipassignment.conf located on fw mod $FWDIR/conf
verify it's config with this splat command:
#vpn ipafile_check ipassignment.conf detail
#vpn ipafile_check ipassignment.conf detail
Checking the Syntax of the ipassignment.conf file
I remembered what we did:
1. On the Gateway object, under VPN, VPN Advanced, we enabled Dynamic Interface Resolution for SecuRemote/SecureClient upon tunnel initialization. Prior to that Office mode would not work at all.
1. On the Gateway object, under VPN, VPN Advanced, we enabled Dynamic Interface Resolution for SecuRemote/SecureClient upon tunnel initialization. Prior to that Office mode would not work at all.
2. After that the gateway didn't seem to recognise the name of the firewall in the Module column of the ipassignment.conf, so now we just use *
-------------------------------------------------------------------------------------------------------------------------------------------------------------------------
MOBILE ACCESS BLADE IPHONE/IPAD SUPPORT
Configure iPhone Support
You can enable support for iPhone and iPad to allow these devices to access Web applications and
ActiveSync with the Check Point Mobile for iPhone and iPad.
When you enable the Mobile Access Software Blade, all users can authenticate to the gateway with the
iPhone app and with the Mobile Access portal. To change the authentication method for the Mobile Access portal, refer to the R75 Mobile Access Administration Guide
(http://supportcontent.checkpoint.com/documentation_download?ID=11673).Or, you can disable the Mobile Access portal.
- To enable support for iPhone and iPad on the Mobile Access gateway:
1. On the Mobile Access gateway, run:
cvpnd_settings set MobileAppAllowed "true"
2. Restart the Mobile Access Software Blade services: cvpnrestart
- To disable the Mobile Access portal for all other remote access traffic: Run: toggleCvpnPortal off
- To enable the portal for all remote access traffic: Run: toggleCvpnPortal on
Note - If you use a cluster, repeat each of these actions for all members of a
cluster.
sk53002: Check Point Mobile for iPhone configuration in R71.30 enables user/password authentication to the Mobile Access Blade PortalR75 Support for iPhone and Skype Release Notes
KNOW LIMITATION
R71.30
Check Point Mobile for iPhone and iPad 00624534 The Link Translation Domain feature is not supported with iPhones. Disable Link Translation Domain on Mobile Access gateways before you connect to them with the iPhone App. 00573299 If this supplement is installed, the Mobile Access portal supports username and password authentication only. 00597730 Interactive Simultaneous Login Prevention (SLP) is not supported. 00568280 Application protection levels that include authentication settings are not supported. R75
00624534 The Link Translation Domain feature is not supported with iPhones. Disable Link
Translation Domain on Mobile Access gateways before you connect to them with
the iPhone App.
00597730 Interactive Simultaneous Login Prevention (SLP) is not supported.
00568280 Application protection levels that include authentication settings are not
supported.
00644551 After you configure your mail settings, the Mail Setup application is removed from
the Check Point Mobile application list.
If you need to configure the mail settings again, tap the Options icon in the
bottom-left corner of the Check Point Mobile application and set "Enable Mail
Settings" to On. Now the Mail Setup application is listed again in the Check Point
Mobile application list.
00643766 Internal user passwords can be up to 8 ASCII characters.
Native Application


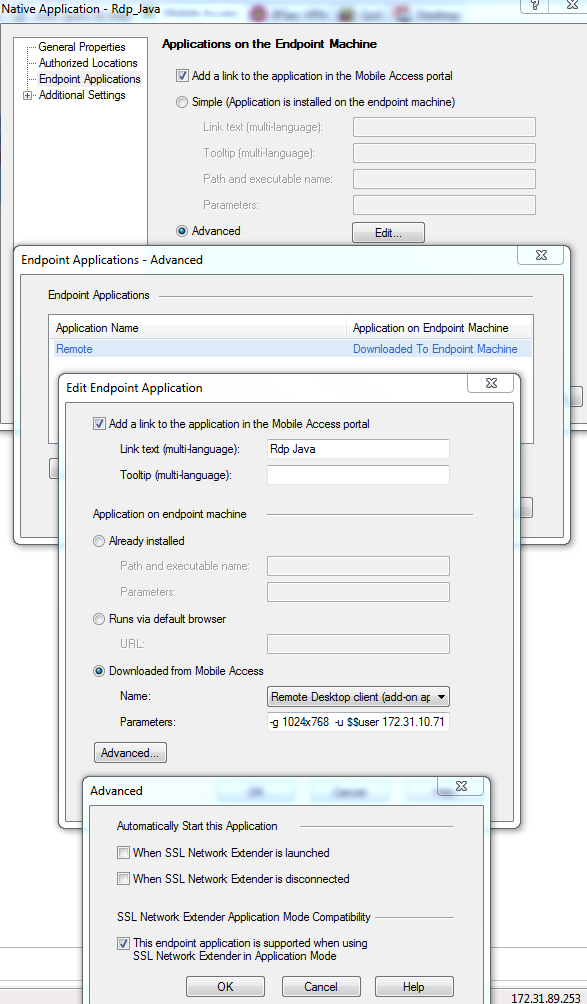
-g 1024x768 -l WARN -d domain.local -u $$user 169.169.169.169
More Info : R75.40 Mobile Access Administration Guide
##############################################################################
- IDENTITY AWARENESS
To enable Identity Awareness:
- 1. Log in to SmartDashboard.
- 2. From the Network Objects tree, expand the Check Point branch.
- 3. Double-click the gateway on which to enable Identity Awareness.
- 4. On the General Properties page > Additional Features section, select Identity Awareness.
Or
From the Gateway Properties tree, select Identity Awareness. On the Identity Awareness page, select
Enable Identity Awareness.
The Identity Awareness Configuration wizard opens
- 5. Select one or both options. These options set the methods for acquiring identities of managed and
unmanaged assets.
· AD Query - Lets the Security Gateway seamlessly identify Active Directory users and computers.
· Captive Portal - Sends users to a Web page to acquire identities from unidentified users.
See Choosing Identity Sources (on page 43).
- 6. Click Next.
The Integration With Active Directory window opens.
When SmartDashboard is part of the domain, SmartDashboard suggests this domain automatically. If
you select this domain, the system creates an LDAP Account Unit with all of the domain controllers in
the organization's Active Directory.
Note - We highly recommend that you go to the LDAP Account Unit
and make sure that only necessary domain controllers are in the list. If
AD Query is not required to operate with some of the domain
controllers, delete them from the LDAP Servers list.
With the Identity Awareness configuration wizard you can use existing LDAP Account units or create a
new one for one AD domain. If you create a new domain, the LDAP account unit that the system creates
contains only the domain controller you set manually. If it is necessary for AD Query to fetch data from
other domain controllers, you must add them at a later time manually to the LDAP Servers list after you
complete the wizard.
To view/edit the LDAP Account Unit object, go to the Firewall tab > Servers and OPSEC Applications
tab in the objects tree > LDAP Account Unit.
The LDAP Account Unit name syntax is: <domain name>_ _ AD
- 7. From the Select an Active Directory list, select the Active Directory to configure from the list that
shows configured LDAP account units or create a new domain. If you have not set up Active Directory,
you need to enter a domain name, username, password and domain controller credentials.
- 8. Enter the Active Directory credentials and click Connect to verify the credentials.
Important - For AD Query you must enter domain administrator credentials. For Captive Portal standard
credentials are sufficient.
- 9. If you selected to use Captive Portal and do not wish to configure Active Directory, select I do not wish to configure Captive Portal at this time and click Next.
- 10. Click Next.
If you selected Captive Portal on the first page, the Captive Portal Settings page opens.
- 11. In the Captive Portal Settings page, select a URL for the portal, where unidentified users will be directed.
All IP addresses configured for the gateway show in the list. The IP address selected by default is the
<gateway's main IP address>/connect.
The same IP address can be used for other portals with different paths.
For example:
· Identity Awareness Captive Portal - 10.10.20.1/connect
· DLP Portal - 2.2.2.2/DLP
· Mobile Access Portal - 2.2.2.2/sslvpn
- 12. By default, the portal is accessible only through internal interfaces. To change this, click Edit. We do not
recommend that you make the portal accessible through external interfaces on a perimeter gateway.
- 13. Click Next to complete the wizard and see what is configured.
The Identity Awareness is Now Active page opens.
14. Click Finish.
15. Select Policy > Install from the SmartDashboard menu.
Results of the Wizard
These are the results of the wizard:
· Depending on the acquisition methods you set, Active Directory and / or Captive Portal become active.
· When you set an Active Directory domain, the system creates an LDAP Account Unit object for the
Active Directory domain.
To view/edit the LDAP Account Unit object, go to the Firewall tab > Servers and OPSEC Applications
tab in the objects tree > LDAP Account Unit.
The LDAP Account Unit name syntax is: <domain name>_ _ AD
For example, CORP.ACME.COM_ _ AD.
##############################################################################
SMART EVENT
See Installation and Upgrade Guide
See Administrator Guide
##############################################################################
Secure Client E75.x
- Abilitato traffico https da any a firewall
- Abilitato supporto Visitor Mode su porta https nel menu IPsec VPN - Remote Access del gateway firewall

##############################################################################
CERTIFICATE 3rd Party
Example :
Rapid SSL
Download and install CA and CAsubTest SiteHow ToAdd a Root Certificate and Subordinate (Intermediate Certificate) & Request CSR
- Open the SmartDashboard so you can see all of your network devices.
- Right Click on Trusted CAs > New CA > Trusted...

- Give it a name: e.g. DigiCert_Root. (http servers needs to be checked in the 2nd tab for that)
then click the OPSEC PKI tab.
- Click the Get Button and open the file 'TrustedRoot.crt' that DigiCert sent to you.

- When asked 'Do you accept this certificate authority certificate?' click Ok.

- Right Click Trusted CAs > New CA > Subordinate...

- Give it a name: e.g. DigiCertCA_Intermediate.
Then click the OPSEC PKI tab and click Get and find DigiCertCA.crt file.
Then click Ok to trust this certificate.
- Gateway Cluster > VPN > Add > Certificate Nickname (e.g. FQDN)Open the Device properties for the device you want the SSL certificate to be sent out from, click 'Add' to create a CSR.

- Create a Nickname for the certificate (e.g. DigiCert or yourdomain.com).
For the CA to enroll from choose the intermediate you made (e.g. DigiCert_Intermediate).
Then click the Generate button.
- When a popup window says this can't be undone, click Yes.

- Enter all of the CSR details into a single line including your country code.
DN:CN=vpn.yourdomain.com,O=Your Company Inc,L=City,ST=State,C=USexample : CN=vpn.yourdomain.it,C=ITThen click Ok. If you are getting a SAN certificate click 'Define Alternate Names' and specifies those when prompted.
- Click View to see the CSR, then choose to either 'Copy to Clipboard' / 'Save to file' for re-entering in the order form.

- Then during the DigiCert ordering process for Server type: Choose 'Other', then when prompted you can upload or paste your CSR file.
##############################################################################
ENDPOINT SECURITY SERVER (install/upgrade)
NEW INSTALLATION
· Deploy 2K8R2
· Add Features Frameworks 3.5
· Disable Firewall
· Install clean E80.30_CheckPoint_Endpoint_Security_Server_Windows.iso
o Licenze
o Admin
o Gui client
· Reboot
· Import Configuration
%FWDIR%\bin\upgrade_tools> migrate.exe import <input_file_name>
· Execute UepmPolicyExport.msi (possibili warning)
· Upgrade to 80.40
· Upgrade to 80.41
UPGRADE INSTALLATION
“SNAPSHOT”
· Export configurazione
%FWDIR%\bin\upgrade_tools> migrate.exe export <output_file_name>
The <output_file_name> can be the output file path. If you do not include an output file path, the utility generates the tgz file in the %FWDIR%\bin\upgrade_tools directory.
· Run UepmPolicyExport.msi on the E80.3x Endpoint Security Management server (Probably Warning)(This utility exports the policy database from E80.3X)
“SNAPSHOT”
· Important - If installing from a CD, do not let auto run start the E80.40 installation program.
Run Setup.exe from the E80.40 cd
When prompted, reboot the computer.
Upgrading the Endpoint Security Management Server
· On the Endpoint Security Management server, go to the installation folder of the SmartEndpoint. By default this is C:\Program Files (X86 on 64 bit computers)\CheckPoint\SmartConsole\E80.40\PROGRAM\
Run EPUpgradeImportTool.exe. (run as administrator)
Firs run (possibility error)
Second run (Work fine)
· Upgrade to E80.41
Run Setup.exe from the E80.41 (into tgz file)
##############################################################################
ASDSAD