Friday, March 31, 2023

Migrate Export and Migrate Import - Checkpoint Management Server

Process for Migrating to new MGMT appliances:
  

Pre-Requisites

The Firewall Gaia version and JumboHotFix JHF Take of the Checkpoint Primary Management Server where the migrate export is taken from MUST be the same as the  Firewall Gaia version and JumboHotFix JHF Take of the NEW Checkpoint Primary Management Server

The Secondary Management server must ALSO be the same as the  Firewall Gaia version and JumboHotFix JHF Take of the NEW Checkpoint Primary Management Server. It will sync automatically with primary once the name of IPs are the same. 
  • Take a Migrate Export/Backup of the existing Primary
  • Run through the configuration Wizards, set one up as Primary, set one up as a Secondary (use same hostnames and IPs)
  • Do a Migrate Import on the new Primary
  • Swap the cables from the existing Primary with the new Primary* (make sure it says DB synchronized)
  • Power off old Secondary
  • Power on new Secondary
  • Re-establish SIC and make sure DBs synchronize

On Old/Existing Checkpoint Primary Management Server
[Expert@MGMT:0]#cd $FWDIR/bin/upgrade_tools
[Expert@MGMT:0]#yes | nohup ./migrate export /home/admin/bos0105fwm01-033123.tgz 


On NEW Checkpoint Primary Management Server (same Gaia Version and JHF and original FWM). Copy bos0105fwm01-033123.tgz  from old FWM to new FWM

[Expert@MGMT:0] cpstop
[Expert@MGMT:0]# cd $FWDIR/bin/upgrade_tools/
[Expert@MGMT:0]# yes | nohup ./migrate import  /home/admin/bos0105fwm01-033123.tgz 
[Expert@MGMT:0]# cpstart


Below are the command I ran on the test management server MGMT (100.115.22.22) and the output is  CPMGMT011-090622.tgz                                                       


[Expert@MGMT:0]# cd $FWDIR/bin/upgrade_tools
[Expert@MGMT:0]# pwd
/opt/CPsuite-R80.40/fw1/bin/upgrade_tools
[Expert@MGMT:0]# cd $HOME
[Expert@MGMT:0]# yes | nohup ./migrate export /home/admin/CPMGMT011-090622.tgz  
nohup: appending output to 'nohup.out'
[Expert@MGMT:0]#

[Expert@MGMT:0]]# ls -lt
total 2180396
-rw-rw---- 1 admin root  1026123583 Sep  6 10:48 
CPMGMT011-090622.tgz
[Expert@MGMT:0]#
 

The operations will look like this:
 
# cpstop
# cd /opt/CPsuite-R77/fw1/bin/upgrade_tools
# ./migrate export /var/log/migrate-export/sms-mig-export-20160414
 
You are required to close all clients to Security Management Server
or execute 'cpstop' before the Export operation begins.
 
Do you want to continue? (y/n) [n]?
 
Copying required files...
Compressing files...
 
The operation completed successfully.
 
Location of archive with exported database: /var/log/migrate-export/sms-mig-export-20160414.tgz
 
#cpstart


Run through the configuration Wizards, set one up as Primary, set one up as a Secondary (use same hostnames and IPs)

  • Connect your laptop RJ45 connection to the Checkpoint Appliance Mgmt Interface. By default, this IP address is 192.168.1.1/24.
  • Add and IPv4 IP address to the RJ45 adaptor on your laptop to 192.168.1.2 and subnet mask 255.255.255.0
  • From your laptop you should be able to ping the 192.168.1.1 and from the Checkpoint Appliance you should be able to ping the laptop IP address 192.168.1.2. 
  • If you cannot ping you may want to connect your laptop USB to Serial connection to Checkpoint appliance and login to the appliance. By default the login username and password is admin 
  • Open browser and go to https://192.168.1.1


Reference

Migrate Export    sk133312 - How to run a 'migrate export' or 'migrate import' command that survives a closed/timed-out SSH session

Abstract

When you run a 'migrate export' or 'migrate import' command, the command is tied to the current CLI session. When the current CLI session ends (the SSH connection times out, or is closed), the 'migrate' process is halted/canceled. 

This can also happen when the exported management database is very large (30GB or more): for example, the export of a management database of 30GB can take 3 to 4 hours to complete. This means that the CLI session (SSH session) must stay active for 3 to 4 hours.

Solution

To make sure the 'migrate export' command survives these scenarios and continues to run successfully in the background, run the command with the following syntax:


[Expert@MGMT:0]# cd $FWDIR/bin/upgrade_tools/
[Expert@MGMT:0]# yes | nohup ./migrate export [options] /<full path>/<name of exported file without any extension>

To make sure the 'migrate import' command survives these scenarios and continues to run successfully in the background, run it with the following syntax:

[Expert@MGMT:0]# cd $FWDIR/bin/upgrade_tools/
[Expert@MGMT:0]# yes | nohup ./migrate import [options] /<full path>/<name of exported file>.tgz


Migrate Export
cd $FWDIR/bin/upgrade_tools
yes | nohup ./migrate export /home/admin/bos0105fwm01-033123.tgz 


Migrate Import
cpstop
cd $FWDIR/bin/upgrade_tools/
yes | nohup ./migrate import [options] /<full path>/<name of exported file>.tgz
yes | nohup ./migrate import  /home/admin/bos0105fwm01-033123.tgz 
cpstart


In Boston DC … Upgrade Checkpoint Firewall bos0102fwm01 from R80.40 to 81.10 
1.      Snapshot back up of Firewall Management Primary  bos0102fwm01
2.      Export snapshots
3.      Migrate Export - 
3.      Install - Fresh Install and upgrade packages R80.40 to 81.10
4.      Verify Update package / Fix errors if any.
5.      Once successfully verify.
6.      Select Upgrade (not Install update)
7.      After R81.10 install completes,
8.      Run Deployment Agent - DeploymentAgent_000002205_1
9.      Install JHF – 64  (Will be installed after secondary is upgraded)
10.     Push policy –  to   Internet Firewalls, VPN etc


Tuesday, March 7, 2023

Checkpoint Troubleshooting

Checkpoint Firewalls has the following software blades:

Smart Console  - Security Management Server - Security Gateway


  1. IPSec VPN -Site to Site VPN
  2. Mobile Access - End User VPN - Integration with RSA Token/RSA Cloud Token
  3. Identity Awareness - Integration with AD - PDP, PEP
  4. Geo-Block - Block Countries 
  5. IPS/IDS - Prevent, Inactive, 
  6. AD/AV Anti Virus/Anti Bot
  7. URL Filtering - Web site by category, user, groups and machine to protect users from malicious sites and safe use of the internet. UserCheck Technology(Block Page) 
  8. Application Control - User Group to Identify, Access or Category Blocks of Application 
  9. SSL Inspection
  10. Monitoring
  11. Clustering ClusterXL

1. Check Point Firewall: How To Add A Static Route In CLI In Gaia
You don't do this in expert mode.  Here is how you add a static route in Gaia in CLI below.  It works well if you prefer CLI to the GUI.
CP> set static-route 0.0.0.0/1 nexthop gateway address 5.5.5.5 on


Check Point Firewall: "enabled_blades" In CLI


2. CPVIEW
3. Zdebug
4, FW Monitor
5. TCPDump
6. SmartView Tracker

FW CTL ZDEBUG is a CLI command that is for seeing dropped packets in real-time on the firewall.  This can include packets that are dropped from the Check Point application OR from the OS of the box.  From the application, this could mean the Rulebase, IPS, etc.  From the OS, this could mean dropped packets due to a full queue, etc.  ZDEBUG is especially helpful in determining the reason a packet is dropped.  The reality is that some packets that are dropped just do not show up in SmartView Tracker. 

Below is an example of some dropped packets and the reasons:

;[cpu_9];[fw4_6];fw_log_drop_ex: Packet proto=6 157.216.110.162:36299 -> 64.25.9.4:23 dropped by fw_handle_first_packet Reason: Rulebase drop - rule 10;  

<-- This was dropped because of the Check Point firewall rulebase.  Rule 10 was a rule that it matched and dropped.


;[cpu_10];[fw4_5];fw_log_drop_ex: Packet proto=6 195.88.209.216:51921 -> 64.25.9.22:33909 dropped by fw_handle_first_packet Reason: Geo Protection;  

<-- Simple enough.  This packet is from Russia, which is blocked on this firewall.

fw ctl zdebug drop is the CLI command.  This captures all packets that are dropped.  You can use the grep option to cut down on the amount of traffic you see and specifically search for traffic you want to see.

fw ctl zdebug drop | grep 10.19.4.4  will search for any dropped packet with a source or destination IP address of 10.19.4.4.


FW MONITOR is a CLI command that is for packet capturing through the firewall in real-time.  This command does not show dropped packets.  fw monitor allows you to capture packets at multiple capture positions within the FireWall-1 kernel module chain; both for inbound and outbound packets. This enables you to trace a packet through the different functionalities of the firewall. The primary mode of troubleshooting would be to use the something like the following to see packets for source of 29.27.7.2 or destination of 29.27.7.2:

fw monitor -e "accept src=29.27.7.2 or dst=29.27.7.2;"  This will show you the stages of the IP of 29.27.7.2 as a source or destination. 

Most of the time, you want to see the packet go all the way through the kernel.  Your command might look something like this: 

fw monitor -e "accept host (29.27.7.2);"  

This will show you the 4 stages that this particular IP goes through, and is most likely what you will use the most.  You are basically looking at this view of the packet traversal below.  This will help you determine if packets are coming through, and if NAT’ing and routing is working.  


You can also expand this view by using the –p all option, as show below:

fw monitor –p all -e "accept host (29.27.7.2);" 

You are basically looking at a multiple point view of the packet traversal through the firewall:


TCPDump is a CLI command that allows you to capture packets on the interface.  You see packets, real-time, as they hit the interface, but not through the firewall.  Only on the interface is where you are capturing on.  This is similar to the way packet captures work on a Cisco ASA or what you would see in Wireshark.  If you see a packet coming in an interface, but not out an interface, you will probably need to run the fw monitor command to find out where it is failing.  If you suspect dropped packets, you can use the zdebug command.

tcpdump -i eth1 host 172.24.8.200     <---- Tells to monitor eth1 for this hosts.

NOTES***
'tcpdump -i' captures traffic on specific interface.
'tcpdump -e' displays Source and Destination MAC addresses.

CTRL+C stops 'tcpdump'.

By default, only the first 68 bytes of every packet are captures, unless the capture size is increased with '-s' flag. For users running without data encryption, passwords are also copied into this file. 


Check Point Firewall: tcpdump In CLI
Do a tcpdump to verify that the packets were actually leaving the firewall.  It is.  You can see it coming in from the private IP of 10.10.10.10, then being NAT'ed to the public 55.55.55.55 and on to 4.2.2.2.

[Expert@CheckPoint1:0]# tcpdump -i any -vvv dst 4.2.2.2
tcpdump: WARNING: Promiscuous mode not supported on the "any" device
tcpdump: listening on any, link-type LINUX_SLL (Linux cooked), capture size 96 bytes

12:25:20.917906 IP (tos 0x0, ttl 127, id 8280, offset 0, flags [none], proto: ICMP (1), length: 60) 10.10.10.10 > 4.2.2.2: ICMP echo request, id 1, seq 19, length 40
12:25:20.918146 IP (tos 0x0, ttl 126, id 8280, offset 0, flags [none], proto: ICMP (1), length: 60) 55.55.55.55 > 4.2.2.2: ICMP echo request, id 46253, seq 19, length 40
12:25:21.919046 IP (tos 0x0, ttl 127, id 8285, offset 0, flags [none], proto: ICMP (1), length: 60) 10.10.10.10 > 4.2.2.2: ICMP echo request, id 1, seq 20, length 40
12:25:21.919096 IP (tos 0x0, ttl 126, id 8285, offset 0, flags [none], proto: ICMP (1), length: 60) 55.55.55.55 > 4.2.2.2: ICMP echo request, id 46253, seq 20, length 40
12:25:26.863785 IP (tos 0x0, ttl 127, id 8291, offset 0, flags [none], proto: ICMP (1), length: 60) 10.10.10.10 > 4.2.2.2: ICMP echo request, id 1, seq 21, length 40
12:25:26.863884 IP (tos 0x0, ttl 126, id 8291, offset 0, flags [none], proto: ICMP (1), length: 60) 55.55.55.55 > 4.2.2.2: ICMP echo request, id 46253, seq 21, length 40
12:25:27.862351 IP (tos 0x0, ttl 127, id 8293, offset 0, flags [none], proto: ICMP (1), length: 60) 10.10.10.10> 4.2.2.2: ICMP echo request, id 1, seq 22, length 40


Firewalls And NAT'ing And The Traveling Packet

Its an interesting thing to me, that NAT'ing takes place before routing does on most firewalls.  So, if your public IP address space was 10.10.10.X/24, and you decided that you wanted to NAT your internal 192.168.1.10 server to the public IP address of 10.4.4.4, you could.  Now, you might start to think that "you cant do that" because your 10.4.4.4 is not on your 10.10.10.X/24 address space, right?  Well, actually, that is wrong.  You actually CAN  have a public IP address that is not on your public IP range and have it NAT through to your internal server.  Routing at the upstream router certainly poses a problem, but if a packet can make it to your firewall, then you can NAT your traffic to any public IP address you want to, even if its not part of your IP range on  your firewall interface.

I actually went through this recently on a certain problem I was having on a Check Point firewall.  You see, it was the same thing really.  I had a public range of, lets say, 40.40.40.0/25.  This gives us 126 usable IP addresses (1-126).  However, in the config, they had some NATs that were outside of that range.  Now, just so you know, they actually owned the whole /24 of 40.40.40.0.  But, on the firewall interface, they had split up this subnet and were not using anything above this range (40.40.40.0/25).
In our example, they had a static NAT translation of 40.40.40.200 pointing to a webserver inside the network at 192.168.1.200.  I thought that since it was not on the subnet of the public facing NIC on the firewall, the firewall would try to route it out its default gateway (the upstream router), which would try to send it back and ultimately the TTL would hit 0 and the packet would drop.  But, this is NOT what happens.  What actually happens is that NAT is checked FIRST.

Below, I have the best explanation (from Cisco) of the process the packet actually takes going through the firewall from the outside to the inside.  This process also applies to Check Point as well.  Notice that first, the ACL is checked to see if the packet is allowed, then NAT.   Notice its not until step 7 and 8 where routing comes into place.  Its a very interesting process for sure.  Take a walk through the steps below.  Its a really good read through.
Steps

1. The packet is reached at the ingress interface. Once the packet reaches the internal buffer of the interface, the input counter of the interface is incremented by one. 

2. Cisco ASA first looks at its internal connection table details in order to verify if this is a current connection. If the packet flow matches a current connection, then the Access Control List (ACL) check is bypassed and the packet is moved forward. If packet flow does not match a current connection, then the TCP state is verified. If it is a SYN packet or UDP (User Datagram Protocol) packet, then the connection counter is incremented by one and the packet is sent for an ACL check. If it is not a SYN packet, the packet is dropped and the event is logged. 

3. The packet is processed as per the interface ACLs. It is verified in sequential order of the ACL entries and if it matches any of the ACL entries, it moves forward. Otherwise, the packet is dropped and the information is logged. The ACL hit count is incremented by one when the packet matches the ACL entry. 

4. The packet is verified for the translation rules. If a packet passes through this check, then a connection entry is created for this flow and the packet moves forward. Otherwise, the packet is dropped and the information is logged. 

5. The packet is subjected to an Inspection Check. This inspection verifies whether or not this specific packet flow is in compliance with the protocol. Cisco ASA has a built-in inspection engine that inspects each connection as per its pre-defined set of application-level functionality. If it passed the inspection, it is moved forward. Otherwise, the packet is dropped and the information is logged. Additional security checks will be implemented if a Content Security (CSC) module is involved. 

6. The IP header information is translated as per the Network Address Translation/ Port Address Translation (NAT/PAT) rule and checksums are updated accordingly. The packet is forwarded to Advanced Inspection and Prevention Security Services Module (AIP-SSM) for IPS related security checks when the AIP module is involved. 

7. The packet is forwarded to the egress interface based on the translation rules. If no egress interface is specified in the translation rule, then the destination interface is decided based on the global route lookup. 

8. On the egress interface, the interface route lookup is performed. Remember, the egress interface is determined by the translation rule that takes the priority. 

9. Once a Layer 3 route has been found and the next hop identified, Layer 2 resolution is performed. The Layer 2 rewrite of the MAC header happens at this stage. 

10. The packet is transmitted on the wire, and interface counters increment on the egress interface. 

11. The packet is transmitted on the wire, and interface counters increment on the egress interface.


Below is Check Points explanation in the CP documentation.  Very similar.


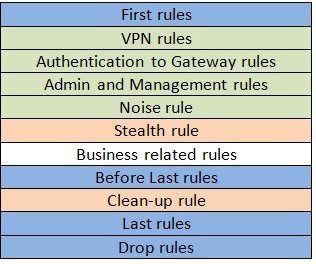
Check Point Firewall: Rulebase Audit

Audit a company's check point firewalls, to see what security items need to be looked at.

Here is a good copy and paste from the best practices sk106597.

The Business related rules section contains the rules that regulate your business traffic.
Business related rules should be grouped together in logical sub-sections to make the format of the rulebase easy to understand. 


The sub-sections that are most heavily used should be placed highest in the rulebase (so long as doing this does not compromise SecureXL tuning).

The blue coded rules are the Implied Rules (Policy > Global Properties > Firewall Implied Rules).
The enabled default Implied rules can be selectively turned off if not required or if the administrator has created specific rules to replace them. This is often done to harden or 'nail-down' the rulebase.

The green coded rules are VPN, management and noise rules.
The admin and management rules control access to the firewall e.g. SSH, HTTPS etc. If the implied rules have been disabled then specific rules to permit all required connections to and from the firewalls will be required.

The purpose of the Noise rule is to drop unwanted traffic such as NetBIOS traffic as high up in the rulebase as possible.

The use of a Noise rule helps to make the firewall more efficient by dropping unwanted traffic high up in the rulebase instead of at the bottom of the rulebase (clean-up rule).

If the 'noise' traffic is mixed with 'useful' traffic then additional noise rules can be placed within the Business related rules section to drop the unwanted noise traffic once the useful traffic has been matched.

The Stealth rule should be located as early as possible in the policy, typically placed immediately after the management rules. The purpose of the Stealth rule is to drop unauthorized connections destined to the firewall; protecting the firewall from being scanned and attacked.

The rulebase is likely to be constantly evolving so the effectiveness of the Stealth rule should be periodically tested; it may need to be re-positioned to maintain effectiveness.

The clean-up rule is the last rule in the rulebase and is used to drop and log explicitly unmatched traffic.

To improve the rulebase performance, noise traffic that is logged in the Clean-up rule should be included in the Noise rule so it is matched and dropped higher up in the rulebase.


A "beeping" Check Point management station.  running the hardware diagnostics tool off of a USB drive, and it came back clean.  
So I ran the command "raidconfig status" and found that I had a hard drive go bad.  You will see it says "degraded" and "failed" on drive 2.  Time for a replacement.

Smart1> raidconfig status
-- Controller Information --
ID       MODEL
C0       MegaRAID SAS 8704EM2


-- Arrays information --
ID       Type    Size            State
C0V0     RAID10 1.816 TB         Degraded


-- Disks information --
ID               Model                   Size            Status
DISK #1          WD1003FBYX-01Y7B0       931.512GB       Online
DISK #2          WD1003FBYX-01Y7B0       931.512GB       Failed
DISK #3          WD1003FBYX-01Y7B0       931.512GB       Online
DISK #4          WD1003FBYX-01Y7B0       931.512GB       Online
Smart1>


2. Check Point Firewall: How To Push Policy Locally In CLI
Did you know that you can "push policy" from CLI?  In this case, I have a Check Point 4800 that I want to install the policy on, but not through the GUI.  I want to do this in CLI.  So, I do the following:
CP> fw fetch localhost
Installing Security Policy Standard on all.all@CP
Fetching Security Policy from localhost succeeded
CP>


3. Check Point Firewall: CPInfo Changes
Looks like collecting a CPInfo   See below the process I went through when collecting this for TAC:

Started downloading updated package
Downloading update package cpinfo_914000124_1.tgz - 3758008/3758008 (100%)
Downloaded package verification succeeded
Starting installation of new CPinfo version
CPinfo update finished successfully!
Launching new version of CPinfo

Would you like to upload CPinfo file securely to Check Point Download Center? y/n: [y]y

Verifying CK...

Please provide an SR number:5-1321133444
Invalid SR format
Collecting information...: 100%
Compressing output file... 105%
Compressing output file - done (/var/log/cp.cpinfo.gz)

                Uploading...

Initiating connection to User Center: Done.
Generating list of files to be uploaded: Done.
Sending list of files to server:

Uploading CP_15_12_2015_14_39.CPViewDB.dat.gz
Uploading cp.cpinfo.gz0320)
Uploading:   0% (0/56013920)
Done
CP>
Please provide an SR number:5-1321133444

                CPinfo Creation...

Collecting information...: 35%

URL Filtering


Security Blades - 

Here is a list of Checkpoint Security blades and methods to bypass/white list them

IPS 
AV/AB  Anti-Virus/Anti-Bot
URL Filtering 
Application Control 
SSL Inspection
ClusterXL


Regular Expression for URL Filter White Listing

(^|.*\.)*microsoft\.com
(^|.*\.)*windowsupdate\.com

msftemail.com
net-login.com
com-onlinebanking.com
com-token-auth.com
net-login.com
protected-forms.com
internalportal.net
donotreply.biz

(^|.*\.)*msftemail\.com
(^|.*\.)*net-login\.com
(^|.*\.)*com-onlinebanking\.com
(^|.*\.)*com-token-auth\.com
(^|.*\.)*net-login\.com
(^|.*\.)*protected-forms\.com
(^|.*\.)*internalportal\.net
(^|.*\.)*donotreply\.netiz
msftemail.com
net-login.com
com-onlinebanking.com
com-token-auth.com
net-login.com
protected-forms.com
internalportal.net
donotreply.biz