Friday, May 3, 2019

CoreXL Administration

CoreXL Administration

CoreXL is a performance-enhancing technology for Security Gateways on multi-core processing platforms. CoreXL enhances Security Gateway performance by enabling the processing cores to concurrently perform multiple tasks.
CoreXL provides almost linear scalability of performance, according to the number of processing cores on a single machine. The increase in performance is achieved without requiring any changes to management or to network topology.
CoreXL joins ClusterXL Load Sharing and SecureXL as part of Check Point's fully complementary family of traffic acceleration technologies.
In a Security Gateway with CoreXL enabled, the Firewall kernel is replicated multiple times. Each replicated copy, or instance, runs on one processing core. These instances handle traffic concurrently, and each instance is a complete and independent inspection kernel. When CoreXL is enabled, all the kernel instances in the Security Gateway process traffic through the same interfaces and apply the same security policy.

Related Topics

Supported Platforms and Unsupported Features

CoreXL is supported:
  • SecurePlatform
  • Gaia
  • IPSO
  • Crossbeam platforms
Unsupported Features:
CoreXL does not support Check Point Suite with these features:
  • Check Point QoS (Quality of Service)
  • Route-based VPN
  • IPv6 on IPSO
  • Overlapping NAT
To enable a non-supported feature in the Check Point Suite, disable CoreXL using cpconfig and reboot the gateway (see Configuring CoreXL).

Default Configuration

When you enable CoreXL, the number of kernel instances is based on the total number of CPU cores.
Number of Cores
Number of Kernel Instances
1
1
2
2
4
3
8
6
12
10
More than 12
Number of cores, minus 2
The default affinity setting for all interfaces is automatic when Performance Pack is installed. See Processing Core Allocation. Traffic from all interfaces is directed to the core running the Secure Network Distributor (SND).

CoreXL for IPv6

R76 supports multiple cores for IPv6 traffic. For each firewall kernel instance that works with IPv4 traffic, there is a corresponding firewall kernel instance that also works with IPv6 traffic. Both instances run on the same core.
To check the status of CoreXL on your Security Gateway, run:
fw6 ctl multik stat.
The fw6 ctl multik stat (multi-kernel statistics) command shows IPv6 information for each kernel instance. The state and processing core number of each instance is displayed, along with:
  • The number of connections currently running.
  • The peak number of concurrent connections the instance has used since its inception.

Configuring IPv4 and IPv6 Firewall Instances

After IPv6 support is enabled on the gateway, you can configure the gateway's processing cores to run different combinations of IPv4 and IPv6 firewall kernel instances.
  • The number of IPv4 instances range from a minimum of two to a number equal to the maximum number of cores on the gateway.
    By default, the number of IPv6 firewall instances is set to two.
  • The number of IPv6 instances range from a minimum of two to a number equal to the number of IPv4 instances.
    The number of IPv6 instances cannot exceed the number of IPv4 instances.
To configure the number of IPv6 firewall instances:
  1. From a command line on the gateway, run: cpconfig.
    The configuration menu shows.
  2. Enter option 8: Configure Check Point CoreXL.
Configure Check Point CoreXL...
===============================
CoreXL is currently enabled with 3 firewall instances and 2 IPv6 firewall instances.
 
(1) Change the number of firewall instances
(2) Change the number of IPv6 firewall instances
(3) Disable Check Point CoreXL
 
(4) Exit 
The Configuring Check Point CoreXL menu shows how many IPv4 and IPv6 firewall instances are running on the processing cores.
  1. Enter option 2: Change the number of IPv6 firewall instances.
    The menu shows how many cores are available on the gateway.
  2. Enter the total number of IPv6 firewall instances to run.
    You can only select a number from within the range shown.
  3. Reboot the gateway.
Example:
A gateway that has four cores and is running three IPv4 instances of the firewall kernel and two IPv6 instances of the firewall kernel can be represented like this:
Core
Firewall instances
IPv6 Firewall instances
CPU 0


CPU 1
fw4_2

CPU 2
fw4_1
fw6_1
CPU 3
fw4_0
fw6_0

3 instances of IPv4
2 instances of IPv6
  • The minimum allowed number of IPv4 instances is two and the maximum four
  • The minimum allowed number of IPv6 instances is two and the maximum is three
To increase the number of IPv6 instances to four, you must first increase the number of IPv4 firewall instances to the maximum of four:
How many firewall instances would you like to enable (2 to 4)[3] ? 4
 
CoreXL was enabled successfully with 4 firewall instances.
Important: This change will take effect after reboot. 
The gateway now looks like this:
Core
Firewall instances
IPv6 Firewall instances
CPU 0
fw4_3

CPU 1
fw4_2

CPU 2
fw4_1
fw6_1
CPU 3
fw4_0
fw6_0

4 instances of IPv4
2 instances of IPv6
Increase the number of IPv6 instances to four:
How many IPv6 firewall instances would you like to enable (2 to 4)[2] ? 4
 
CoreXL was enabled successfully with 3 IPv6 firewall instances.
Important: This change will take effect after reboot. 
The gateway now looks like this:
Core
Firewall instances
IPv6 Firewall instances
CPU 0
fw4_3
fw6_3
CPU 1
fw4_2
fw6_2
CPU 2
fw4_1
fw6_1
CPU 3
fw4_0
fw6_0

4 instances of IPv4
4 instances of IPv6

Performance Tuning

The following sections are relevant only for SecurePlatform.

Processing Core Allocation

The CoreXL software architecture includes the Secure Network Distributor (SND). The SND is responsible for:
  • Processing incoming traffic from the network interfaces
  • Securely accelerating authorized packets (if Performance Pack is running)
  • Distributing non-accelerated packets among kernel instances.
Traffic entering network interface cards (NICs) is directed to a processing core running the SND. The association of a particular interface with a processing core is called the interface's affinity with that core. This affinity causes the interface's traffic to be directed to that core and the SND to run on that core. Setting a kernel instance or a process to run on a particular core is called the instance's or process's affinity with that core.
The default affinity setting for all interfaces is Automatic. Automatic affinity means that if Performance Pack is running, the affinity for each interface is automatically reset every 60 seconds, and balanced between available cores. If Performance Pack is not running, the default affinities of all interfaces are with one available core. In both cases, any processing core running a kernel instance, or defined as the affinity for another process, is considered unavailable and will not be set as the affinity for any interface.
In some cases, which are discussed in the following sections, it may be advisable to change the distribution of kernel instances, the SND, and other processes, among the processing cores. This is done by changing the affinities of different NICs (interfaces) and/or processes. However, to ensure CoreXL's efficiency, all interface traffic must be directed to cores not running kernel instances. Therefore, if you change affinities of interfaces or other processes, you will need to accordingly set the number of kernel instances and ensure that the instances run on other processing cores.
Under normal circumstances, it is not recommended for the SND and an instance to share a core. However, it is necessary for the SND and an instance to share a core when using a machine with exactly two cores.

Allocating Processing Cores

In certain cases, it may be advisable to change the distribution of kernel instances, the SND, and other processes, among the processing cores. This section discusses these cases.
Before planning core allocation, make sure you have read the Processing Core Allocation.

Adding Processing Cores to the Hardware

Increasing the number of processing cores on the hardware platform does not automatically increase the number of kernel instances. If the number of kernel instances is not increased, CoreXL does not utilize some of the processing cores. After upgrading the hardware, increase the number of kernel instances using cpconfig.
Reinstalling the gateway will change the number of kernel instances if you have upgraded the hardware to an increased number of processing cores, or if the number of processing cores stays the same but the number of kernel instances was previously manually changed from the default. Use cpconfig to reconfigure the number of kernel instances.
In a clustered deployment, changing the number of kernel instances (such as by reinstalling CoreXL) should be treated as a version upgrade. Follow the instructions in the R76 Installation and Upgrade Guide, in the "Upgrading ClusterXL Deployments" chapter, and perform either a Minimal Effort Upgrade (using network downtime) or a Zero Downtime Upgrade (no downtime, but active connections may be lost), substituting the instance number change for the version upgrade in the procedure. A Full Connectivity Upgrade cannot be performed when changing the number of kernel instances in a clustered environment.

Allocating an Additional Core to the SND

In some cases, the default configuration of instances and the SND will not be optimal. If the SND is slowing the traffic, and your platform contains enough cores that you can afford to reduce the number of kernel instances, you may want to allocate an additional core to the SND. This is likely to occur especially if much of the traffic is of the type accelerated by Performance Pack; in a ClusterXL Load Sharing deployment; or if IPS features are disabled. In any of these cases, the task load of the SND may be disproportionate to that of the kernel instances.
To check if the SND is slowing down the traffic:
  1. Identify the processing core to which the interfaces are directing traffic using fw ctl affinity -l -r.
  2. Under heavy traffic conditions, run the top command on the CoreXL gateway and check the values for the different cores under the 'idle' column.
It is recommended to allocate an additional core to the SND only if all of the following conditions are met:
  • Your platform has at least eight processing cores.
  • The 'idle' value for the core currently running the SND is in the 0%-5% range.
  • The sum of the 'idle' values for the cores running kernel instances is significantly higher than 100%.
If any of the above conditions are not met, the default configuration of one processing core allocated to the SND is sufficient, and no further configuration is necessary.
Allocating an additional processing core to the SND requires performing the following two stages in the order that they appear:
  1. Reduce the number of kernel instances using cpconfig.
  2. Set interface affinities to the remaining cores, as detailed below.
  3. Reboot to implement the new configuration.
Setting Interface Affinities
Check which cores are running the kernel instances. See also Allocating Processing Cores. Allocate the remaining cores to the SND by setting interface affinities to the cores. The correct method of defining interface affinities depends on whether or not Performance Pack is running, as described in the following sections.
  • When Performance Pack is Running
    If Performance Pack is running, interface affinities are handled by using Performance Pack's sim affinity command.
    The default sim affinity setting is Automatic. In Performance Pack's Automatic mode, interface affinities are automatically distributed among cores that are not running kernel instances and that are not set as the affinity for any other process.
    In most cases, you do not need to change the sim affinity setting.
  • Setting Interface Affinities when Performance Pack is not Running
    If Performance Pack is not running, interface affinities are loaded at boot from a configuration text file called fwaffinity.conf, located under: $FWDIR/conf . In the text file, lines beginning with the letter i define interface affinities.
    If Performance Pack is running, interface affinities are defined by sim affinity settings, and lines beginning with i in fwaffinity.conf are ignored.
    If you are allocating only one processing core to the SND, it is best to have that core selected automatically by leaving the default interface affinity set to automatic, and having no explicit core affinities for any interfaces. To do this, make sure fwaffinity.conf contains the following line:
    i default auto
    In addition, make sure that fwaffinity.conf contains no other lines beginning with i, so that no explicit interface affinities are defined. All interface traffic will be directed to the remaining core.
    If you are allocating two processing cores to the SND, you need to explicitly set interface affinities to the two remaining cores. If you have multiple interfaces, you need to decide which interfaces to set for each of the two cores. Try to achieve a balance of expected traffic between the cores (you can later check the balance by using the top command).
To explicitly set interface affinities, when Performance Pack is not running:
  1. Set the affinity for each interface by editing fwaffinity.conf. The file should contain one line beginning with i for each interface. Each of these lines should follow the following syntax:
    i <interfacename> <cpuid>
    where <interfacename> is the interface name, and <cpuid> is the number of the processing core to be set as the affinity of that interface.
    For example, if you want the traffic from eth0 and eth1 to go to core #0, and the traffic from eth2 to go to core #1, create the following lines in fwaffinity.conf:
    i eth0 0
    i eth1 0
    i eth2 1
    Alternatively, you can choose to explicitly define interface affinities for only one processing core, and define the other core as the default affinity for the remaining interfaces, by using the word default for <interfacename>.
    In the case described in the previous example, the lines in fwaffinity.conf would be:
    i eth2 1
    i default 0
  2. Run $FWDIR/scripts/fwaffinity_apply for the fwaffinity.conf settings to take effect.
The affinity of virtual interfaces can be set using their physical interface(s).

Allocating a Core for Heavy Logging

If the gateway is performing heavy logging, it may be advisable to allocate a processing core to the fwd daemon, which performs the logging. Like adding a core for the SND, this too will reduce the number of cores available for kernel instances.
To allocate a processing core to the fwd daemon, you need to do two things:
  1. Reduce the number of kernel instances using cpconfig.
  2. Set the fwd daemon affinity, as detailed below.
Setting the fwd Daemon Affinity
Check which processing cores are running the kernel instances and which cores are handling interface traffic using fw ctl affinity -l -r. Allocate the remaining core to the fwd daemon by setting the fwd daemon affinity to that core.
Note - Avoiding the processing core or cores that are running the SND is important only if these cores are explicitly defined as affinities of interfaces. If interface affinities are set to Automatic, any core that is not running a kernel instance can be used for the fwd daemon, and interface traffic will be automatically diverted to other cores.
Affinities for Check Point daemons (such as the fwd daemon), if set, are loaded at boot from the fwaffinity.conf configuration text file located at: $FWDIR/conf . Edit the file by adding the following line:
n fwd <cpuid>
where <cpuid> is the number of the processing core to be set as the affinity of the fwd daemon. For example, to set core #2 as the affinity of the fwd daemon, add to the file:
n fwd 2
Reboot for the fwaffinity.conf settings to take effect.

Configuring CoreXL

To enable/disable CoreXL:
  1. Log in to the Security Gateway.
  2. Run cpconfig
  3. Select Configure Check Point CoreXL.
  4. Enable or disable CoreXL.
  5. Reboot the Security Gateway.
To configure the number of instances:
  1. Run cpconfig
  2. Select Configure Check Point CoreXL.
  3. If CoreXL is enabled, enter the number of firewall instances.
    If CoreXL is disabled, enable CoreXL and then set the number of firewall instances.
Reboot the gateway.
Note - In a clustered deployment, changing the number of kernel instances should be treated as a version upgrade.

Command Line Reference

Affinity Settings

Affinity settings controlled by the fwaffinity_apply script file, which executes automatically at boot. When you make a change to affinity settings, the settings will not take effect until you either reboot or manually execute the fwaffinity_apply script.
fwaffinity_apply executes affinity definitions according to the information in the fwaffinity.conf text file. To change affinity settings, edit the text file.
Note - If Performance Pack is running, interface affinities are only defined by Performance Pack's sim affinity command. The fwaffinity.conf interface affinity settings are ignored.

fwaffinity.conf

fwaffinity.conf is located in the $FWDIR/conf directory.

Syntax

Each line in the text file uses the same format: <type> <id> <cpu>
Data
Values
Description
<type>
i
interface
n
Check Point daemon
k
kernel instance
<id>
interface name
if <type> = i
daemon name
if <type> = n
instance number
if <type> = k
default
interfaces that are not specified in another line
<cpuid>
<number>
number(s) of processing core(s) to be set as the affinity
all
all processing cores are available to the interface traffic, daemon or kernel instance
ignore
no specified affinity (useful for excluding an interface from a default setting)
auto
Automatic mode See also Processing Core Allocation.
Note - Interfaces that share an IRQ cannot have different cores as their affinities, including when one interface is included in the default affinity setting. Either set both interfaces to the same affinity, or use ignore for one of them. To view the IRQs of all interfaces, run: fw ctl affinity -l -v -a .

fwaffinty_apply

fwaffinity_apply is located in the $FWDIR/scripts directory. Use the following syntax to execute the command: $FWDIR/scripts/fwaffinity_apply <option>
where <option> is one of the following parameters:
Parameter
Description
-q
Quiet mode - print only error messages.
-t <type>
Only apply affinity for the specified type.
-f
Sets interface affinity even if automatic affinity is active.

fw ctl affinity

The fw ctl affinity command controls affinity settings. However, fw ctl affinity settings will not persist through a restart of the Security Gateway.
To set affinities, execute fw ctl affinity -s.
To list existing affinities, execute fw ctl affinity -l.

fw ctl affinity -s

Use this command to set affinities.
fw ctl affinity -s settings are not persistent through a restart of the Security Gateway. If you want the settings to be persistent, either use sim affinity or edit the fwaffinity.conf configuration file.
To set interface affinities, you should use fw ctl affinity only if Performance Pack is not running. If Performance Pack is running, you should set affinities by using the Performance Pack sim affinity command. These settings will be persistent. If Performance Pack's sim affinity is set to Automatic mode (even if Performance Pack was subsequently disabled), you will not be able to set interface affinities by using fw ctl affinity -s.
Syntax
fw ctl affinity -s <proc_selection> <cpuid>
<proc_selection> is one of the following parameters:
Parameter
Description
-p <pid>
Sets affinity for a particular process, where <pid> is the process ID#.
-n <cpdname>
Sets affinity for a Check Point daemon, where <cpdname> is the Check Point daemon name (for example: fwd).
-k <instance>
Sets affinity for a kernel instance, where <instance> is the instance's number.
-i <interfacename>
Sets affinity for an interface, where <interfacename> is the interface name (for example: eth0).
<cpuid> should be a processing core number or a list of processing core numbers. To have no affinity to any specific processing core, <cpuid> should be: all.
Note - Setting an Interface Affinity will set the affinities of all interfaces sharing the same IRQ to the same processing core.
To view the IRQs of all interfaces, run: fw ctl affinity -l -v -a
Example
To set kernel instance #3 to run on processing core #5, run:
fw ctl affinity -s -k 3 5

fw ctl affinity -l

Use this command to list existing affinities. For an explanation of kernel, daemon and interface affinities, see CoreXL Administration.
Syntax
fw ctl affinity -l [<proc_selection>] [<listtype>]
If <proc_selection> is omitted, fw ctl affinity -l lists affinities of all Check Point daemons, kernel instances and interfaces. Otherwise, <proc_selection> is one of the following parameters:
Parameter
Description
-p <pid>
Displays the affinity of a particular process, where <pid> is the process ID#.
-n <cpdname>
Displays the affinity of a Check Point daemon, where <cpdname> is the Check Point daemon name (for example: fwd).
-k <instance>
Displays the affinity of a kernel instance, where <instance> is the instance's number.
-i <interfacename>
Displays the affinity of an interface, where <interfacename> is the interface name (for example: eth0).
If <listtype> is omitted, fw ctl affinity -l lists items with specific affinities, and their affinities. Otherwise, <listtype> is one or more of the following parameters:
Parameter
Description
-a
All: includes items without specific affinities.
-r
Reverse: lists each processing core and the items that have it as their affinity.
-v
Verbose: list includes additional information.
Example
To list complete affinity information for all Check Point daemons, kernel instances and interfaces, including items without specific affinities, and with additional information, run:
fw ctl affinity -l -a -v

fw ctl multik stat

The fw ctl multik stat and fw6ctl multik stat (multi-kernel statistics) commands show information for each kernel instance. The state and processing core number of each instance is displayed, along with:

  • The number of connections currently being handled.
  • The peak number of concurrent connections the instance has handled since its inception.

Thursday, April 4, 2019

3DES Remediation and Troubleshooting


[Expert@myvpn01]# unset TMOUT
[Expert@myvpn01]#
[Expert@myvpn01]#
[Expert@myvpn01]#
[Expert@myvpn01]#
[Expert@myvpn01]# enabled_blades
fw vpn urlf av appi ips identityServer SSL_INSPECT anti_bot ThreatEmulation mon vpn
[Expert@myvpn01]#
[Expert@myvpn01]#
[Expert@myvpn01]#
[Expert@myvpn01]#
[Expert@myvpn01]#

[Expert@myvpn01]# cp -v $CPDIR/registry/HKLM_registry.data $CPDIR/registry/HKLM_registry.data_ORIGINAL
`/opt/CPshrd-R80/registry/HKLM_registry.data' -> `/opt/CPshrd-R80/registry/HKLM_registry.data_ORIGINAL'
[Expert@myvpn01]# ckp_regedit -a SOFTWARE\\CheckPoint\\FW1 DISABLE_3DES 1

[Expert@myvpn01]# ckp_regedit -p SOFTWARE\\CheckPoint\\FW1 | grep --color DISABLE_3DES
SOFTWARE\CheckPoint\FW1 : { CurrentVersion=[s]6.0 DISABLE_3DES=[s]1 }
[Expert@myvpn01]#

sk128652 Scenario 10


ROLL BACK 
[Expert@myvpn01]#
[Expert@myvpn01]# cp $CPDIR/registry/HKLM_registry.data_ORIGINAL $CPDIR/registry/HKLM_registry.data       
[Expert@myvpn01]#
[Expert@myvpn01]#
[Expert@myvpn01]# ckp_regedit -p SOFTWARE\\CheckPoint\\FW1 | grep --color DISABLE_3DES
[Expert@myvpn01]#
[Expert@myvpn01]#
[Expert@myvpn01]# cpstop; cpstart


TROUBLESHOOTING 

[Expert@myvpn01]# fw tab -t userc_key -s

[Expert@myvpn01]# fw monitor -e "accept host(73.60.142.217);"

[Expert@myvpn01]# tcpdump -v -nni eth3-02 host 73.60.142.217

[Expert@myvpn01]# tcpdump -v -nni eth3-02 host 73.60.142.217 and port 443

[Expert@myvpn01]# tcpdump -vvv -nni eth3-02 host 73.60.142.217 and port 443


[Expert@myvpn01]# history
    1  unset TMOUT
    2  enabled_blades
    3  cp -v $CPDIR/registry/HKLM_registry.data $CPDIR/registry/HKLM_registry.data_ORIGINAL
    4  ckp_regedit -a SOFTWARE\\CheckPoint\\FW1 DISABLE_3DES 1
    5  ckp_regedit -p SOFTWARE\\CheckPoint\\FW1 | grep --color DISABLE_3DES
    6  cpstop; cpstart
    7  cphaprob stat
    8  fw tab -t userc_key -s
    9  fw monitor -e "accept host(73.60.142.217);"
   10  tcpdump -v -nni eth3-02 host 73.60.142.217
   11  tcpdump -v -nni eth3-02 host 73.60.142.217 and port 443
   12  tcpdump -vvv -nni eth3-02 host 73.60.142.217 and port 443
   13  clusterXL_admin down
   14  clusterXL_admin up
   15  cp $CPDIR/registry/HKLM_registry.data_ORIGINAL $CPDIR/registry/HKLM_registry.data
   16  ckp_regedit -p SOFTWARE\\CheckPoint\\FW1 | grep --color DISABLE_3DES
   17  cpstop; cpstart
   18  history
[Expert@myvpn01]#

Tuesday, March 26, 2019

Upgrade R80.10 to R80.20


Upgrading R80.10 to R80.20 is very easy and straight forward but there are some things to look out for ... Make sure you check the arp entry cache, it can full up and cause your dynamic routing such as OSPF to fail.  The default ARP configuration settings are different (lower) on the new R80.20 code the firewalls than in R80.10.

One key thing to note .. if SSL inspection is enable, upgrade from R80.10 to R80.20 .. The difference between base R80.10 and base R80.20 is that R80.10 failed open if the probe bypass mechanism failed while R80.20 fail-closes which causes a much more obvious impact to traffic.

This command will set probe bypass back to fail open on the fly. To fix the issue:
[Gateway@Expert]# fw ctl set int bypass_on_enhanced_ssl_inspection 1

In order to make the change permanent and survive reboots, run this command:

[Gateway@Expert]# echo "bypass_on_enhanced_ssl_inspection=1" >> $FWDIR/boot/modules/fwkern.conf

[Gateway@Expert]#  more /opt/CPsuite-R80.20/fw1/boot/modules/fwkern.conf
enhanced_ssl_inspection=1
bypass_on_enhanced_ssl_inspection=1

Traffic fails because the gateway has probe bypass enabled and the problematic sites require the SNI extension in our Client Hello packets. This has been a known limitation for a very long time.


There should be no impact to traffic functionally but it is technically an impact to security that naturally comes with a fail-open setting.

This should fix your issues but if not then the backup plan would be to discuss disabling probe bypass and making sure the required bypass rules based on IPs are in place.


The OLD default value for the gc_threshx were 256, 512 and 1024. Since R80.x Gaia, the default values are been increased to 512, 2048 and 4096. So in this case, the issue was Gaia OS didn't load the pre-configured value and instead it is using the defaults. 


The configuration were changed between SecurePlatform OS and Gaia OS. The way to keep the configuration persistence is to modify the value through the Gaia portal, because the Gaia Portal configuration overrides the configuration from /etc/sysctl.conf.

Based on additional information this can be used as an action plan:

1. Regain access to the Gaia portal, starting from the "Standby" member, and then repeat the following steps on "Active" member.

[Expert@HostName:0]# cpstop

(If the ARP is still effecting the connections, please disable the WIFI interface, and wait for 1 minute for ARP table to be cleaned)

You can disable the wifi interface by using the command in expert mode:

[Expert@HostName:0]# ifconfig ethx down

Or in clish mode:

set interface ethx state off

2. After stop the Check Point services, you should be able to access the Gaia Portal.

3. Once you login, move to "Network Management" -> "ARP" -> "ARP Table Settings" -> change "Maximum Entries" to 8192 -> click on "Apply".
(Please note, changes from here are surviving reboot).

4. Verify the values are been changed as follows:

[Expert@HostName:0]# cat /proc/sys/net/ipv4/neigh/default/gc_thresh1
1024
[Expert@HostName:0]# cat /proc/sys/net/ipv4/neigh/default/gc_thresh2
4096
[Expert@HostName:0]# cat /proc/sys/net/ipv4/neigh/default/gc_thresh3
8192

[Expert@HostName:0]# dbget dbget ip:arp:cache_size

5. Once values are been confirmed, reboot the device.

[Expert@HostName:0]# reboot

6. Please run the command in step 4 again after reboot to verify the values are staying there. Then proceed with the same change on "Active" member.

[Please note, the mean purpose is to configure a value that suitable for you network. Keep an eye on /var/log/messages file. After a correct value was been set, you should not see the message "kernel: neighbour table overflow" again. If the value for 8192 didn't stop the message, you need to increase the value again to 2 x 8192 = 16384]

For any unwanted circumstance, the workaround to keep this value configured is to reset the value on fly (doesn't survive from reboot):

[Expert@HostName:0]# dbset ip:arp:cache_size 8192
(to confirm the change run:)
[Expert@HostName:0]# for FILE in $(ls -1 /proc/sys/net/ipv4/neigh/default/gc_thresh*) ; do echo "$FILE" contains: ; echo $(cat $FILE) ; done

*If the system kernel unable to load the correct value by completing above procedures, I would consider a problem with the system kernel after upgrade. I recommend reverting back to R80.10 if issue is persisting to keep you business running.


Active Member in Cluster active firewall
Arp Entry  is ***
Number of Routes  1006   


[Expert@myfw-fwa]# arp -an | wc -l
**
[Expert@myfw-fwa]# netstat -rn | wc -l
888

[Expert@myfw-fwa]


Check the threshold - min, soft max , hard max
[Expert@myfw-fwa]# cat /proc/sys/net/ipv4/neigh/default/gc_thresh1
1024
[Expert@myfw-fwa] cat /proc/sys/net/ipv4/neigh/default/gc_thresh2
4096
[Expert@myfw-fwa]# cat /proc/sys/net/ipv4/neigh/default/gc_thresh3
8192
[Expert@myfw-fwa]


Sunday, February 10, 2019

URL Filtering & Identity Awareness Best Practices

URL 
  • Categorize HTTPS Sites
  • Fail Close (for best Security) or Fail open (for best User experience)
     Rule Base Order
  • More Specific rules closer to top
  • More restrictive rules close to top
    White List Policy 
  • Use below order as a template on how to create a policy where you block all traffic by only allow explicit traffic 


The regex wild card section also applies to other areas of whitelisting including URL Filtering.

  • Rule Base Order
    • More Specific rules closer to top
    • More restrictive rules closer to stop


  • White List Policy 
    • Use below order as a template on how to create a a policy where you block all traffic but only allow explicit traffic
Rule 1 – Allow DNS traffic or any other applications that are allowed
Rule 2 – Allow all “White List” URLs and URL categories
Rule 3 - Block any other category for both http and https sites
Rule 4 – Block other traffic other than SSL+Web Browsing
Rule 5 (not listed) – Block all other traffic 


  • Regex 
o   Leverage Regex rather than wild cards for Websites.  This will guarantee that all instances of website will get caught.  
§  *.balloons.com will match www.balloons.com and secure.balloons.com, but will not match balloons.com
§  (^|.*\.)?balloons\.com will match all iterations on the website whether or not a prefix is used

·      HTTPS Inspection – Enable HTTPS inspection for full visibility of your environment


Friday, February 1, 2019

R80.20 - Kernel Ver 3.10 - GPT Partition Table, XFS (partition and file system CHANGES


GaiA 3.10 Installation

Methods
  1. Upgrade/Install  =>   CPUSE   => Kernel3.10, MBR Partition Table, EXT3    (partition table and file system remains the same)
  2. Backup Machine data  => Clean installation  => Kernel 3.10, GPT Partition Table, XFS   (partition and file system CHANGES)

GaiA 3.10  (SK141173)  Upgraded Linux kernel (based on RHEL 7.x kernel 3.10)


Linux Kernel is upgraded to Version 3.10
- Support newer and more advanced hardware and appliances

Partition Table was upgraded from MBR (Master Boot Record) to GPT
  Adds support for large single storage devices

Introducing XFS Filesystem
Faster than EXT3, Specially with large files

Includes new and improved user space packages.


New system tools for debugging, monitoring and configuring the system:
  • iotop (provides I/O runtime stats)
  • lshw (provides detailed information about all HW)
  • lsusb (provides information about all devices connected to USB)
  • lsscsi (provides information about storage)
  • ps (new version, more counters)
  • psmisc (new version, more counters)
  • top (new version, more counters)
  • iostat (new version, more counters)

Thursday, January 31, 2019

ATRG: URL Filtering

Check Point's latest firewall innovation brings the industry's strongest URL Filtering, application and identity control to organizations of all sizes. You can easily create policies which detect or block thousands of applications and internet sites.
Use the Application Control and URL Filtering blades to:
  • Learn about the applications

    Use Check Point's comprehensive AppWiki to understand what applications are used for and what their risk levels are.
  • Create a Granular Policy

    Make rules to allow or block applications or Internet sites, by individual application, application or URL categories, or risk levels. When you use Identity Awareness, you can easily make rules for individuals or different groups of users. You can also create an HTTPS policy that enables the gateway to inspect HTTPS traffic to prevent security risks related to the SSL protocol.
  • Learn What Your Employees are Doing

    Use SmartView Tracker and SmartEvent to understand the application and site traffic that really occurs in your environment. Then change the policy to make it even more effective. Only administrators that have been assigned with relevant permissions can see all the fields in a log. Using these permissions makes sure that restricted data is kept private in logs and cannot be seen by all administrators.
  • Keep Your Policies Updated

    Application and URL Filtering Database is updated regularly with applications and site categories to help you keep your policy current. The gateway connects to the Check Point Online Web Service to identify social networking widgets and website categories for URLs that it does not recognize. Results are stored on a local cache on each Security Gateway. Subsequent uncategorized URLs are first checked against the local cache before querying the Check Point Online Web Service.
  • Custom Applications, Sites, Categories and Groups

    You can create applications, websites, categories and groups that are not in the Application and URL Filtering Database for use in the policy. Use these custom objects to create a Rule Base that meets your organization's requirements. It is also possible to contact Check Point to create customized application signatures that can be imported into the database. This file can contain, for example, a database with an organization's internal applications that are not necessarily web-based.

URL Filtering Categorization Flow

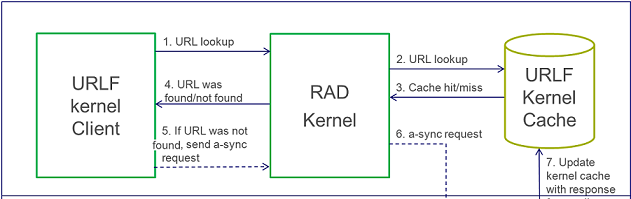
URL Categorization occurs mostly in the kernel:
  • The kernel cache is queried for the URL.
  • The cache lookup first checks for the host, and if there are members, it looks in the members array. If the URL is found in the cache, its categories are returned.
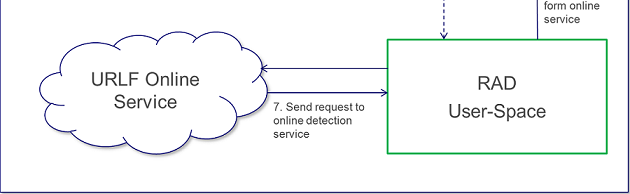
  • If there is no URL in the cache, then a-sync request is issued, asking for online categorization.
  • The user space daemon sends the URL to its user-space module that communicates with Check Point's online detection service.
    Once the online service responds with categories, the kernel cache is updated.

Features

Feature - HTTPS Filtering

Categorization of HTTPS sites without HTTPS inspection (passive HTTPS). Supports URL Filtering on HTTPS traffic without HTTPS inspection.

To enable it, enable the URL Filtering blade:
Go to Application & URL Filtering tab -> Advanced -> Engine Settings -> Enable "Categorize HTTPS sites" and install Security policy

How it works
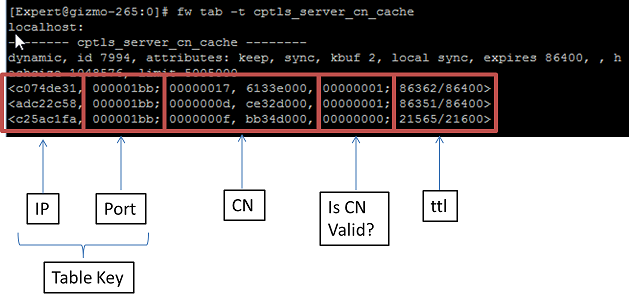
A cache table cptls_server_cn_cache is used here. The cache saves mapping between IP+Port to CN (certificate's Canonical Name) and a flag if the CN is valid.


When SSL traffic is coming, the request (client hello) is recognized by PM (Pattern Matcher) matching on one of SSL request signatures internal procedure. Then the IP+Port will be extracted from the connection and will be searched in the cptls cache and a CN (certificate's Canonical Name) might be found.
If a CN is found and valid, it will be sent to RAD (Resource ADvisor - internal engine responsible for URL Filtering) and the traffic will be categorized according to it. Otherwise, the traffic is continued to be inspected.

When a response (server hello) is coming, it is recognized by PM (Pattern Matcher) matching on one of SSL response signatures internal procedure, the certificate will be extracted and sent to WSTLS process in User mode (in one or more traps). The process will try to resolve the certificate and find its CN.
It will return an asynchronic ioctl with response to the kernel with the IP+Port and the CN (if found).
If a CN is returned, it will be sent to RAD and will be categorized according to it. Otherwise, the IP address will be sent to RAD and will be categorized according to it.

Example: if the certificate's CN is google.com, the categories will be "search engine/portal"


Debugging & Troubleshooting


Run the following debug on the Security Gateway:
CLI commandDescription
for PROC in $(pidof wstlsd) ; do fw debug $PROC on TDERROR_ALL_ALL=6 ; doneDebug wstlsd in User space - refer to sk105559 (output will be in $FWDIR/log/wstlsd.elg)
fw ctl debug 0
fw ctl debug -buf 32000
fw ctl debug -m fw + cptls
fw ctl kdebug -T -f > /var/log/kernel_debug.txt
Debug cptls in kernel (output will be in /var/log/kernel_debug.txt)
fw ctl debug 0
fw ctl debug -buf 32000
fw ctl debug -m APPI all
fw ctl kdebug -T -f > /var/log/appi_debug.txt 
Debug APPI in kernel (output will be in /var/log/appi_debug.txt)
fw ctl debug 0
fw ctl debug -buf 32000
fw ctl debug -m RAD_KERNEL all
fw ctl kdebug -T -f > /var/log/rad_debug.txt
Debug RAD in kernel (output will be in /var/log/rad_debug.txt)
rad_admin rad debug on allDebug RAD in User space (output will be in $FWDIR/log/rad.elg)
To stop, run:
rad_admin rad debug off ALL
Problem: HTTPS Filtering feature is not working.
Troubleshooting:
  1. Make sure you are surfing via port 443 (and not through proxy).
  2. Check that the website you are surfing to is certificated by one of the trusted CAs configured on the SmartDashboard.
    Go to Application & URL Filtering Tab -> Advanced -> HTTPS inspection -> Trusted CAs.
    If not, add its certificate.
  3. Check that wstlsd process is up. Run ps -ax | grep wstlsd
  4. Check that the cptls_server_cn_cache cache table is loaded.
    Run fw tab -t cptls_server_cn_cache -s
  5. Try to find your connection in the table.
    Run fw tab -t cptls_server_cn_cache and search your IP+Port (in hex) in the 2 left columns.
  6. Analyze the debug output file:
    1. Check that the client side was mtached by the PM.
      Search: appi_rad_uf_cmi_handler_match_signature: group_data->group_id 10002002
    2. Check if the IP+Port was found in cptls table.
      Search: fwtls_get_server_cn_from_cache_ex
    3. Check if the server side was matched by the PM.
      Search: appi_rad_uf_cmi_handler_match_signature: group_data->group_id 10002003
    4. Check if the certificate was extracted from the traffic.
      Search: "CERTIFICATE" [in upper case]
    5. Check if the traps were sent to WSTLSD process.
      Search: appi_rad_uf_cmi_handler_ssl_sn_trap -> when you see _last 1 - it means it is the last trap.
    6. Check if you got ioctl from WSTLDS process.
      Search: appi_rad_uf_ssl_cn_cmi_ioctl
    7. Check if anything was sent to RAD.
      Search: rad_kernel_urlf_request_set_url
  7. Make sure you have connectivity to RAD and get response.

Safe Search feature in web browsers is designed to screen sites that contain sexually explicit content and remove them from the search results. While no filter is 100% accurate, Safe Search helps to avoid content you may prefer not to see or would rather your children did not stumble across.
User can change the settings of Safe Search from the browser for each specific search engine.
This feature supports Safe Search in search engines (currently Google, Bing and Yahoo).
To enable it, enable the URL Filtering blade. Go to Application & URL Filtering tab -> Advanced -> Engine Settings -> Enable "Enforce Safe Search in search engines" and install Security policy

How it works

Each search engine has its saved "&meter=value" that is added to the URL when 'Safe search' feature is enabled or disabled. For example, when enabling Safe Search engine in Google, it adds "&safe=active" to the URL. And when disabling it, it adds "&safe=off" to the URL.
Debugging & Troubleshooting
Run the following debug on the Security Gateway:

CLI commandDescription
fw ctl debug 0
fw ctl debug -buf 32000
fw ctl debug -m APPI all
fw ctl kdebug -T -f > /var/log/appi_debug.txt
Debug Application Control in kernel (output will be in /var/log/appi_debug.txt)

Problem: Safe Search feature is not working.

Troubleshooting:
  1. Make sure that you use one of the supported search engines (Google, Bing or Yahoo).
  2. Capture the traffic using WireShark and see if you get redirect from the Security Gateway.
  3. Verify that your URL is matched on one of the signatures from $FWDIR/appi/update/appi_db.C:
    In the debug output file search for:
    appi_rad_uf_cmi_handler_match_signature: group_data->group_id #group number of relevant section of signatures from urlf_group#
  4. If one of the signatures was matched on your URL, analyze the debug output and see how the redirect URL was built.In the debug output file search for:
    appi_rad_uf_cmi_handler_safe_search_handler: redirect_url: #here comes the editted URL#

  5. If no signature was matched on your URL, send your URL to app_request@checkpoint.com with request to add a new signature to our list.

Feature - Cached and Translated pages categorization

With this feature disabled, when a user access the cached pages or Google translated pages, the matched category is ‘Search Engine’ since we drop the query string and send to RAD (Resource ADvisor) the Search Engine domain only.

For example, when accessing http://www.ynet.co.il cached page from Google, the URL looks like: http://webcache.googleusercontent.com/search?ix=seb&sourceid=chrome&ie=UTF-8&q=cache%3Awww.ynet.co.il.
The category will be the category of "webcache.googleusercontent.com" (Search Engine).

This feature extracts the correct domain from the cached / Google translated URL buffer, sends it to RAD and then gets the exact category of the page.
To enable it, enable the URL Filtering blade. Go to Application & URL Filtering tab -> Advanced -> Engine Settings -> Enable "Enforce Safe Search in search engines" and install Security policy

How it works

The signatures are compiled to one PM (Pattern Matcher) that recognizes URLs that try to access the cached/translated pages.
When a URL is coming, the PM matching (built from the relevant signatures of this feature) is executed against it.
If there is a match on one of the signatures, it means that it is cached or translated page.
According to the signature match offset, the host is extracted and sent to RAD and the client will get the correct category of the page.
Debugging & Troubleshooting
Run the following debug on the Security Gateway:

CLI commandDescription
fw ctl debug 0
fw ctl debug -buf 32000
fw ctl debug -m RAD_KERNEL all
fw ctl kdebug -T -f > /var/log/rad_debug.txt
Debug RAD in kernel (output will be in /var/log/rad_debug.txt)
rad_admin rad debug on allDebug RAD in User space (output will be in $FWDIR/log/rad.elg)
To stop, run:
rad_admin rad debug off ALL 
fw ctl debug 0
fw ctl debug -buf 32000
fw ctl debug -m APPI all
fw ctl kdebug -T -f > /var/log/appi_debug.txt
Debug APPI in kernel (output will be in /var/log/appi_debug.txt)
Problem: Cached/Translated pages feature is not working.
Troubleshooting:
  1. Make sure that you are using one of the supported search engines on cached pages (Google, Bing or Yahoo). And Google for translated pages.
  2. Verify that your URL is matched with one of the signatures from $FWDIR/appi/update/appi_db.C.
    In the debug output file search for:
    appi_rad_uf_cmi_handler_match_signature: group_data->group_id 10002000
  3. If one of the signatures was matched on your URL, run debug and see how the cached/translated domain is extracted from the URL.
    In the debug output file search for: appi_rad_uf_cmi_handler_extract_url_after_pm_match
  4. See that the extracted domain is sent to RAD.
    In the debug file search for rad_kernel_urlf_request_set_url
  5. Make sure you have connectivity to RAD and get response.
  6. If no signature was matched on your URL send your URL to app_request@checkpoint.com with request to add a new signature to our list.

URL Filtering Agent

General Description

The new URL Filtering software blade uses a hosted categorization service (cloud-based categorization) that is being constantly updated to cope with the dynamic nature of the web. The Security Gateway is not required to download updates, the categorization database is not limited by the storage space on the Security Gateway, and customers receive the latest categorization to keep policies current.
As requests are being sent to the cloud, responses are being cached locally on the Security Gateway so that subsequent requests for the same sites will not query the cloud, but will be answered by the local cache. In deployments of R75.20 URL Filtering, we have seen that more than 99% of requests are being met by the cache, providing customers with the most up-to-date categorization (with the cloud) on the one hand and minimal latency (as most requests are being met by the cache), on the other.
When there are critical updates, for example, a previously benign site has been hacked and is now used to spread malware, the cache is invalidated and forced to retrieve updates from the cloud.

Processes

The R75.20 URL Filtering blade uses a single user mode process called RAD ($FWDIR/bin/rad) to communicate with the online URL Filtering service. The process is initiated once application control, or URL filtering blades, are active on the Security Gateway. Whenever RAD successfully categorizes a URL, it caches it in its kernel cache.
The URL Filtering kernel cache holds the entire URL Family (i.e. all the URLs within the same host). Whenever there is a request for a new URL categorization, RAD sends to the online categorization service only the host part of the URL and receives the entire URL family. The response is then cached for future use.

Important Files

RAD holds its configuration in 3 files:
  • $FWDIR/conf/rad_settings.C - RAD proxy settings (such as proxy settings)
  • $FWDIR/conf/rad_scheme.C - a file describing where and how to connect to the online services; reloaded on each install policy event.
  • $FWDIR/conf/rad_services.C - a database file that holds the kernel cache setting, such as cache table sizes and max allowed memory usage.

URL Filtering Updates and local database (LDB) files

The RAD kernel cache holds the entire URL Family. Whenever there is a request for a new URL categorization, RAD sends to the online categorization service only the host part of the URL and receives the entire URL family. To keep the response size short, the online service answers only if the URL family has 100 or less members. 99% of the URL database are part of families with 100 or less members and can be retrieved using the online service. The remaining 1% of the database is aggregated in a special file: $FWDIR/appi/update/urlf_db.bin
The file is reloaded on each URL Filtering update. Before sending a new online categorization request to the service, RAD looks in the local LDB file for a match. Only if the URL does not exist in the file, a request to the service is made.
To trigger a reload of the LDB file: rad_admin urlf update $FWDIR/appi/update/urlf_db.bin

Website categorization mode

You can select the mode that is used for web site categorization:
  • Background: requests are allowed until categorization is complete. When a request cannot be categorized with a cached response, an uncategorized response is received. Access to the site is allowed. In the background, the Check Point Online Web Service continues the categorization procedure. The response is then cached locally for future requests (default). This option reduces latency in the categorization procedure.
  • Hold: requests are blocked until categorization is complete. When a request cannot be categorized with the cached responses, it remains blocked until the Check Point Online Web Service completes categorization.

RAD CLI

TopicCLIExplanationExample
Activationrad_admin startStart RAD process 
Activationrad_admin stopStop RAD process 
Activationrad_admin installInstall new RAD policy. RAD will reparse its rad_setting.C file. 
Debugrad_admin rad debug on <topic>Start debug (output is written into $FWDIR/log/rad.elg)rad_admin rad debug on all
Note: "all" must be in small letters
Debugrad_admin rad debug offStop debugrad_admin rad debug off ALL
Note: "ALL" must be in capital letters
Statisticsrad_admin stats on <service>Start collecting statisticsrad_admin stats on urlf
Statisticsrad_admin stats print <service>Print currents statistics to $FWDIR/log/<service>_rad_stats.csvrad_admin stats print urlf
Statisticsrad_admin stats reset <service>Reset all stats countersrad_admin stats reset urlf
Statisticsrad_admin stats print_reset <service>Print current statistics to $FWDIR/log/<service>_rad_stats.csv and reset stats countersrad_admin stats print_reset urlf
Statisticsrad_admin stats off <service>Stop collecting statisticsrad_admin stats off urlf
Updaterad_admin urlf update <full path>Reload URL Filtering local database file 
Fast Pathrad_admin fastpath <service>Issue a request and update security categories in Security Gateway's cache rad_admin fastpath urlf

Main Debug Flags

CLI CommandGW/
Mgmt
Kernel/
User Space
Description
fw ctl debug 0
fw ctl debug -buf 32000
fw ctl debug -m RAD_KERNEL all
fw ctl kdebug -T -f > /var/log/debug_kernel.txt
Security GatewayKernelStart debug of RAD kernel module
rad_admin rad debug onSecurity GatewayUser SpaceStart debug of RAD process
(debug is written into $FWDIR/log/rad.elg)